Table of Contents
Overview
About this document
Why have a web page?
Websites and website software are constantly changing
Why WordPress?
WordPress and Concept of Degrees
Making Changes
Editing Options
Editing Existing Content
Elements
Edit, Clone, Save, Delete
Copying and Modifying
Creating from Scratch
Adding Media
Posts
Job Postings
Other Posts
Quick Jump
How do I...
Export Membership Data
Export Conference Registrations
Change a Member's Status
Overview
About this document
Why have a web page?
Websites and website software are constantly changing
Why WordPress?
WordPress and Concept of Degrees
About this document.
This manual is intended to help you, the user, manage and update the content of the AGFOA.com website. The next sections will provide some step-by-step instructions for this, but this overview will provide some helpful context about the website and how it works.
Website software (and the AGFOA website) are constantly changing, so this manual exists online. This allows for easy updating of instructions and screen shots as things change, and assure that what you are reading here is as up-to-date as possible. If you find yourself looking at instructions here that don’t match what you are are seeing on the the site, just let your web developer know, and he can update this manual.
Why have a web page?
Fair question! A big part of having a web presence is to give businesses and organizations a virtual public-facing entity. It lends legitimacy. In that respect, we want a website that looks professional, is up-to-date, and works across multiple platforms, meaning the various internet browsers and different smart phone operating systems.
Ideally, web pages are also providing information to those that go to it. Let’s think of that information in two categories: Static and Dynamic. Static information is the stuff that rarely changes, like a company’s origin story, or the rules for membership. Static information also tends to stay in the same place on a website. Dynamic information tends to be temporal, like job announcements, annual conferences, or newsletters. Dynamic information can also be displayed contextually - that is, it can be made available for a certain amount of time, be shown only to certain users (i.e. “Members Only” content), or move to different parts of the website (i.e. from “Latest Updates” to “News Archives”). Knowing whether the information you want to share on a website is static or dynamic has big implications for how it is handled on the site.
One more thing. As of May 2023, 67.81% of the total web visits were from mobile devices. Mobile devises, because of those smaller screens, use a different set of rules for displaying internet information than a computer browser does. We need to be sure that the virtual public-facing entity reflects well on the organization. This starts to really impact web design when we consider the next point below.
Websites and website software are constantly changing.
Here’s the rub. Even though the world wide web has been around for a while now, the rules and standards for how it works are still a constant and ever-changing thing. Every new smartphone operating system, every new browser update, every new device that wants access to the internet creates a ripple effect that inevitably requires updating the software that runs the internet, and thereby the software that keeps each website working. Likewise, there are literally millions of hackers, spammers, and other agents of malfeasance who are constantly looking for vulnerabilities in websites. Each time a weakness is discovered, website developers push updates to their software. Many of these updates are invisible, but sometimes that change in software means a thing that was working on a website doesn’t anymore, or something that used to be displayed well on an iPhone now makes the website look broken.
Why WordPress?
There are a lot of ways to put a website on the internet. It can be done without any third-party software, with just a little knowledge of html coding and a computer. That website might look ok on a computer screen, but likely will not look well on a phone. And, as discussed above, a home-spun webpage is going to require near constant updating if we want it to look professional. That’s why most professional pages use third-party software form an organization with a vested interest in keeping up with the ever-changing web environment.
There are a lot of choices out there. There are some over-the-counter options, like Weebly and Squarespace that work well for simple storefront-type sites, but woe be to anyone who wants to customize their site beyond the out-of-the-box options that are given. Then there are companies that build websites. They are still going to use a third-party service to build their platform. There are some options out there for more customizable sites, and each web service will advocate for the one that they use. Here’s why I use WordPress:
- WordPress powers 43% of all websites on the internet.
- It is easy to use.
- It is free, open source software.
- It is fanatically supported, so you can be sure when web weaknesses are found, WordPress will address them.
- WordPress will not disappear. Not only are so many businesses and organizations using it for their websites, but there is a substantial industry of web designers who base their business on the platform. If you need help, there will be someone out there who can provide it at a reasonable rate.
WordPress and Concept of Degrees
My business is one of those that solely use WordPress. COD websites are hosted by a business called WPEngine, which is a hosting service that solely provides hosting to WordPress sites. They run routine checks on all the websites that they host to check for vulnerabilities, needed updates, or potential breakdowns. They make daily backups of all websites so that if something should go wrong, there’s still a functioning version of the site to go back to. All this to say that websites built and hosted through COD are going to be safe, secure, and functioning.
Concept of Degrees wants your business, but also wants the client to be in control. At any time, COD will assist in transferring the site to another service provider. COD will never keep the “keys” to your website. It is your property, and you can manage it accordingly.
Basics: How The Web Site Works
In General
Themes
Front End / Back End
Dashboard
In General
When you call up a web site, you are essentially opening a file that exists somewhere on a computer server. The web URL (www.whatever.com) is the “address” where the file exists. The file is made up of lots of code, termed HTML. Your web browser reads this HTML code to determine what and how to display the content. This HTML code is key. A web page isn’t like a .pdf file or an image that is a static thing that remains consistent from viewer to viewer. A website is built from the ground up each time it is called up and loaded into your browser.
Themes
Nobody wants to build a webpage using just html code. Here’s what that looks like:
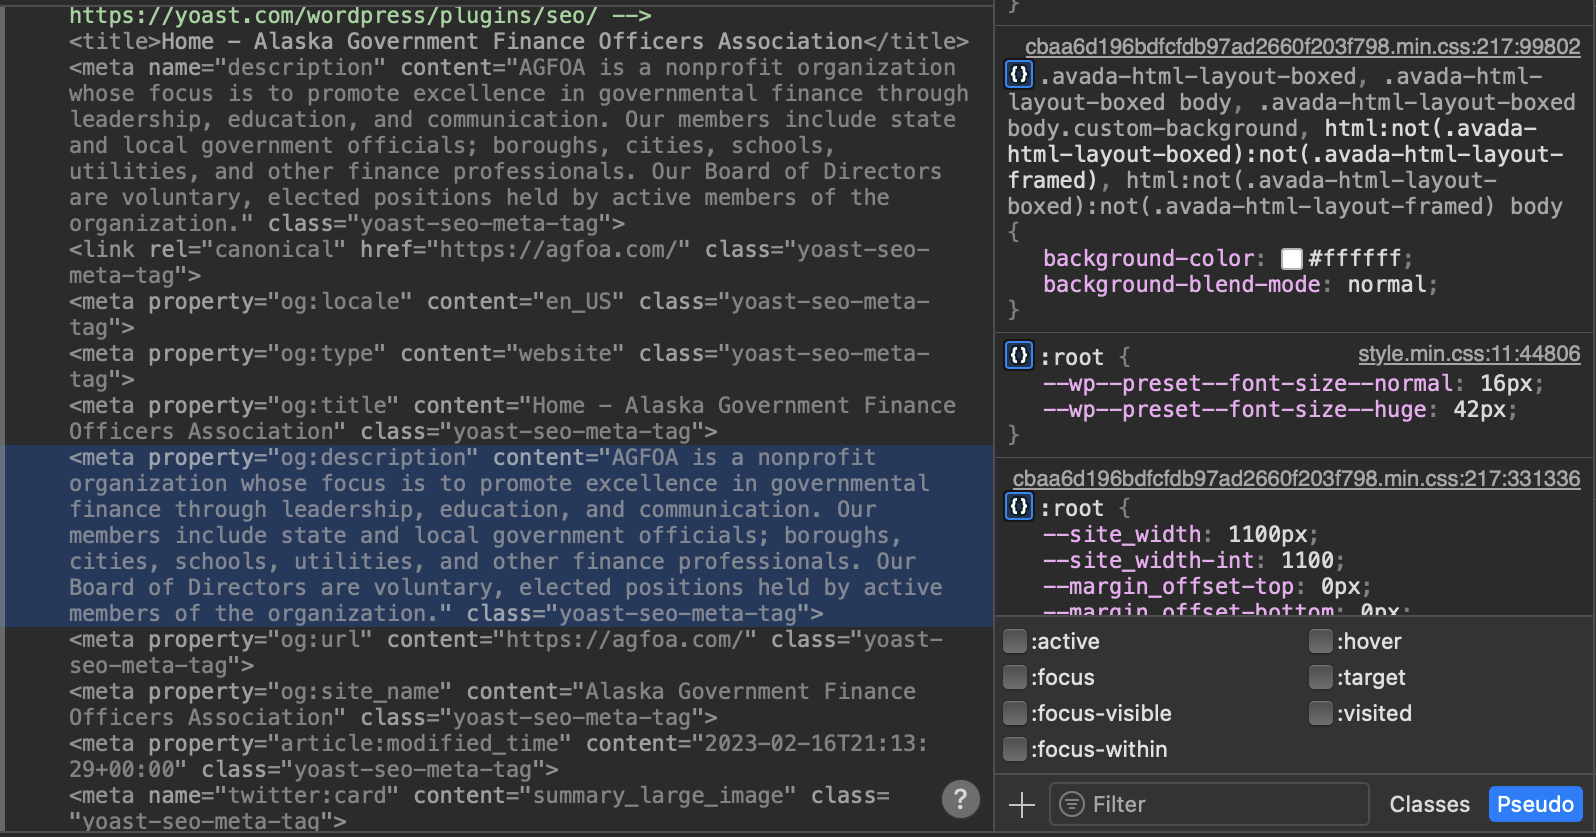
So, instead, we add a layer of software that allows us to better visualize the web site we are building. There are hundreds of thousands of themes available to web builders, and it is easy to quickly get lost in the weeds when searching for the right theme for a web site. For the purposes of AGFOA.com, we are using a theme called Avada. It strikes a compromise between ease of use (moderate) and versatility (high). We won’t be worried too much about the theme for the purposes of this manual, just know that it is the website building software we are using for the AGFOA site.
Front End / Back End
Web developers often talk of the front end (the public-facing view of the web site) and back end (a view of the website and web-building tools available to someone who is logged in as an administrator). From this point on, we will assume that you are logged into the website. If you need more information on logging in, check out the chapter Codes, Access, and Permissions.
Dashboard
After you log in to the AGFOA.com site as an administrator, you will be taken to kind of the home page for the back end of the website, which looks like this:

This is the Dashboard. You can toggle between the Dashboard and the front end of the site by clicking in the upper right-hand corner of the page:

When you are logged in as an administrator, you will see an additional menu even when you are on the front end. You toggle back to the dashboard by clicking on the same area:

The Dashboard provides a lot of tools and information, and it can seem overwhelming. For the purposes of basic website building, though, there are just a few tools to focus on.
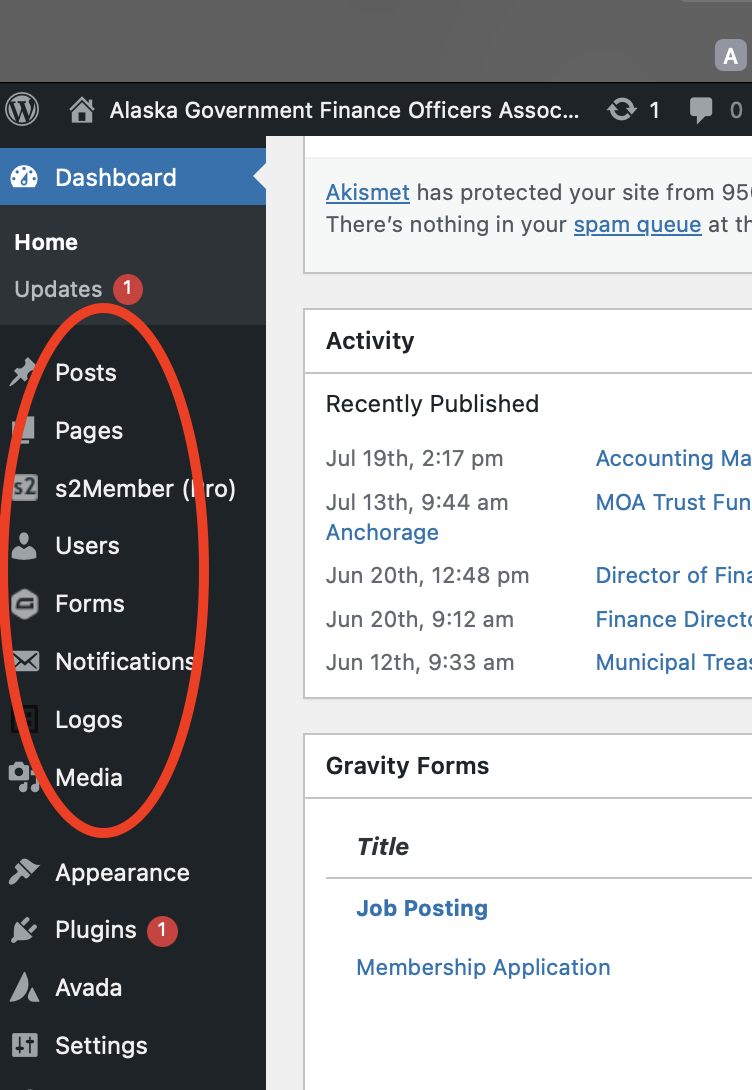
Pages
Viewing Pages
Containers
Elements
Viewing Pages
A web page is a basic unit of a web site. We will consider a web page to be whatever content you can view on your web browser without having to click a link to go somewhere else. Think of a web page is the blank slate we build from.
From the Dashboard, clicking “Pages” will give us a view of all the separate pages on the AGFOA website that looks like this:
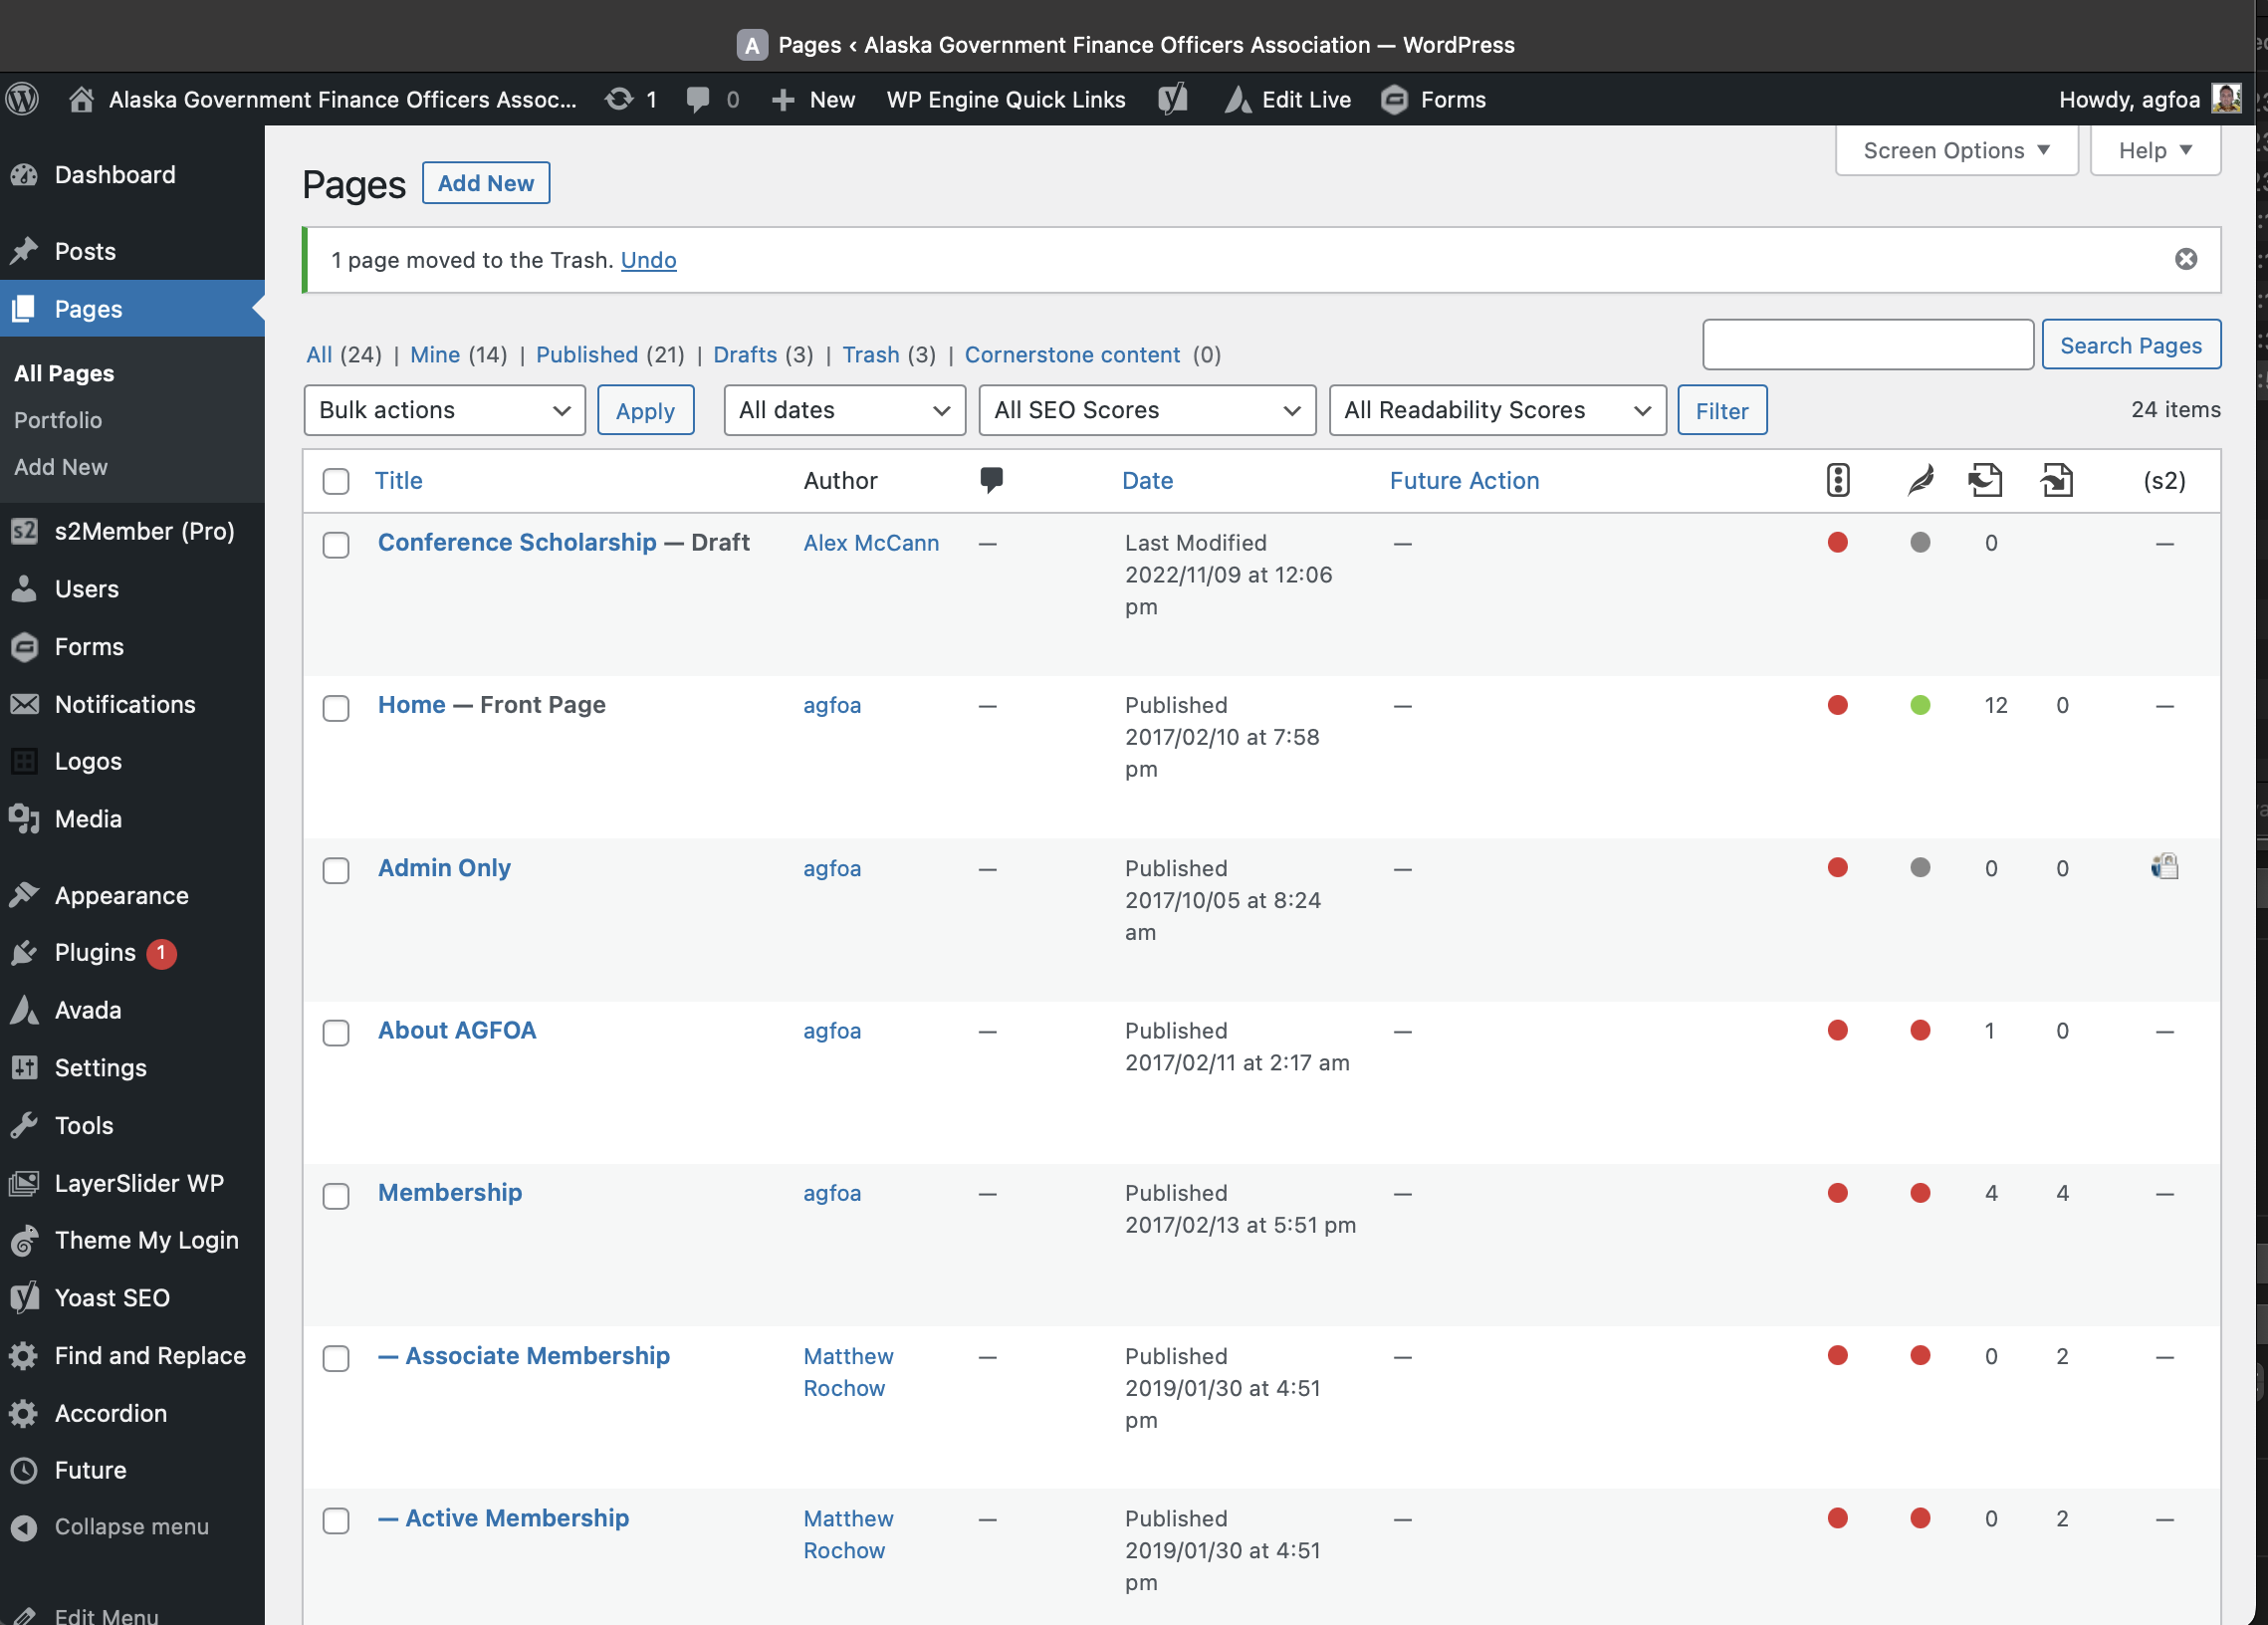
The default order for screens that look like this is by the most recent addition or update. You can change the order by clicking in the column heading. Clicking on any page title will open the editable back-end version of the page. Hovering over the page title with your mouse will give you a few more options.
Before we go deeper into pages, let’s look at a few more components.
Containers
A container is a building block for pages and posts, and holds the content that is in it on the page. Containers can hold static information, like text or an image, or dynamic information, like the most recent posts or other code. We decide what kind of content will go into a container by choosing Elements (described below).
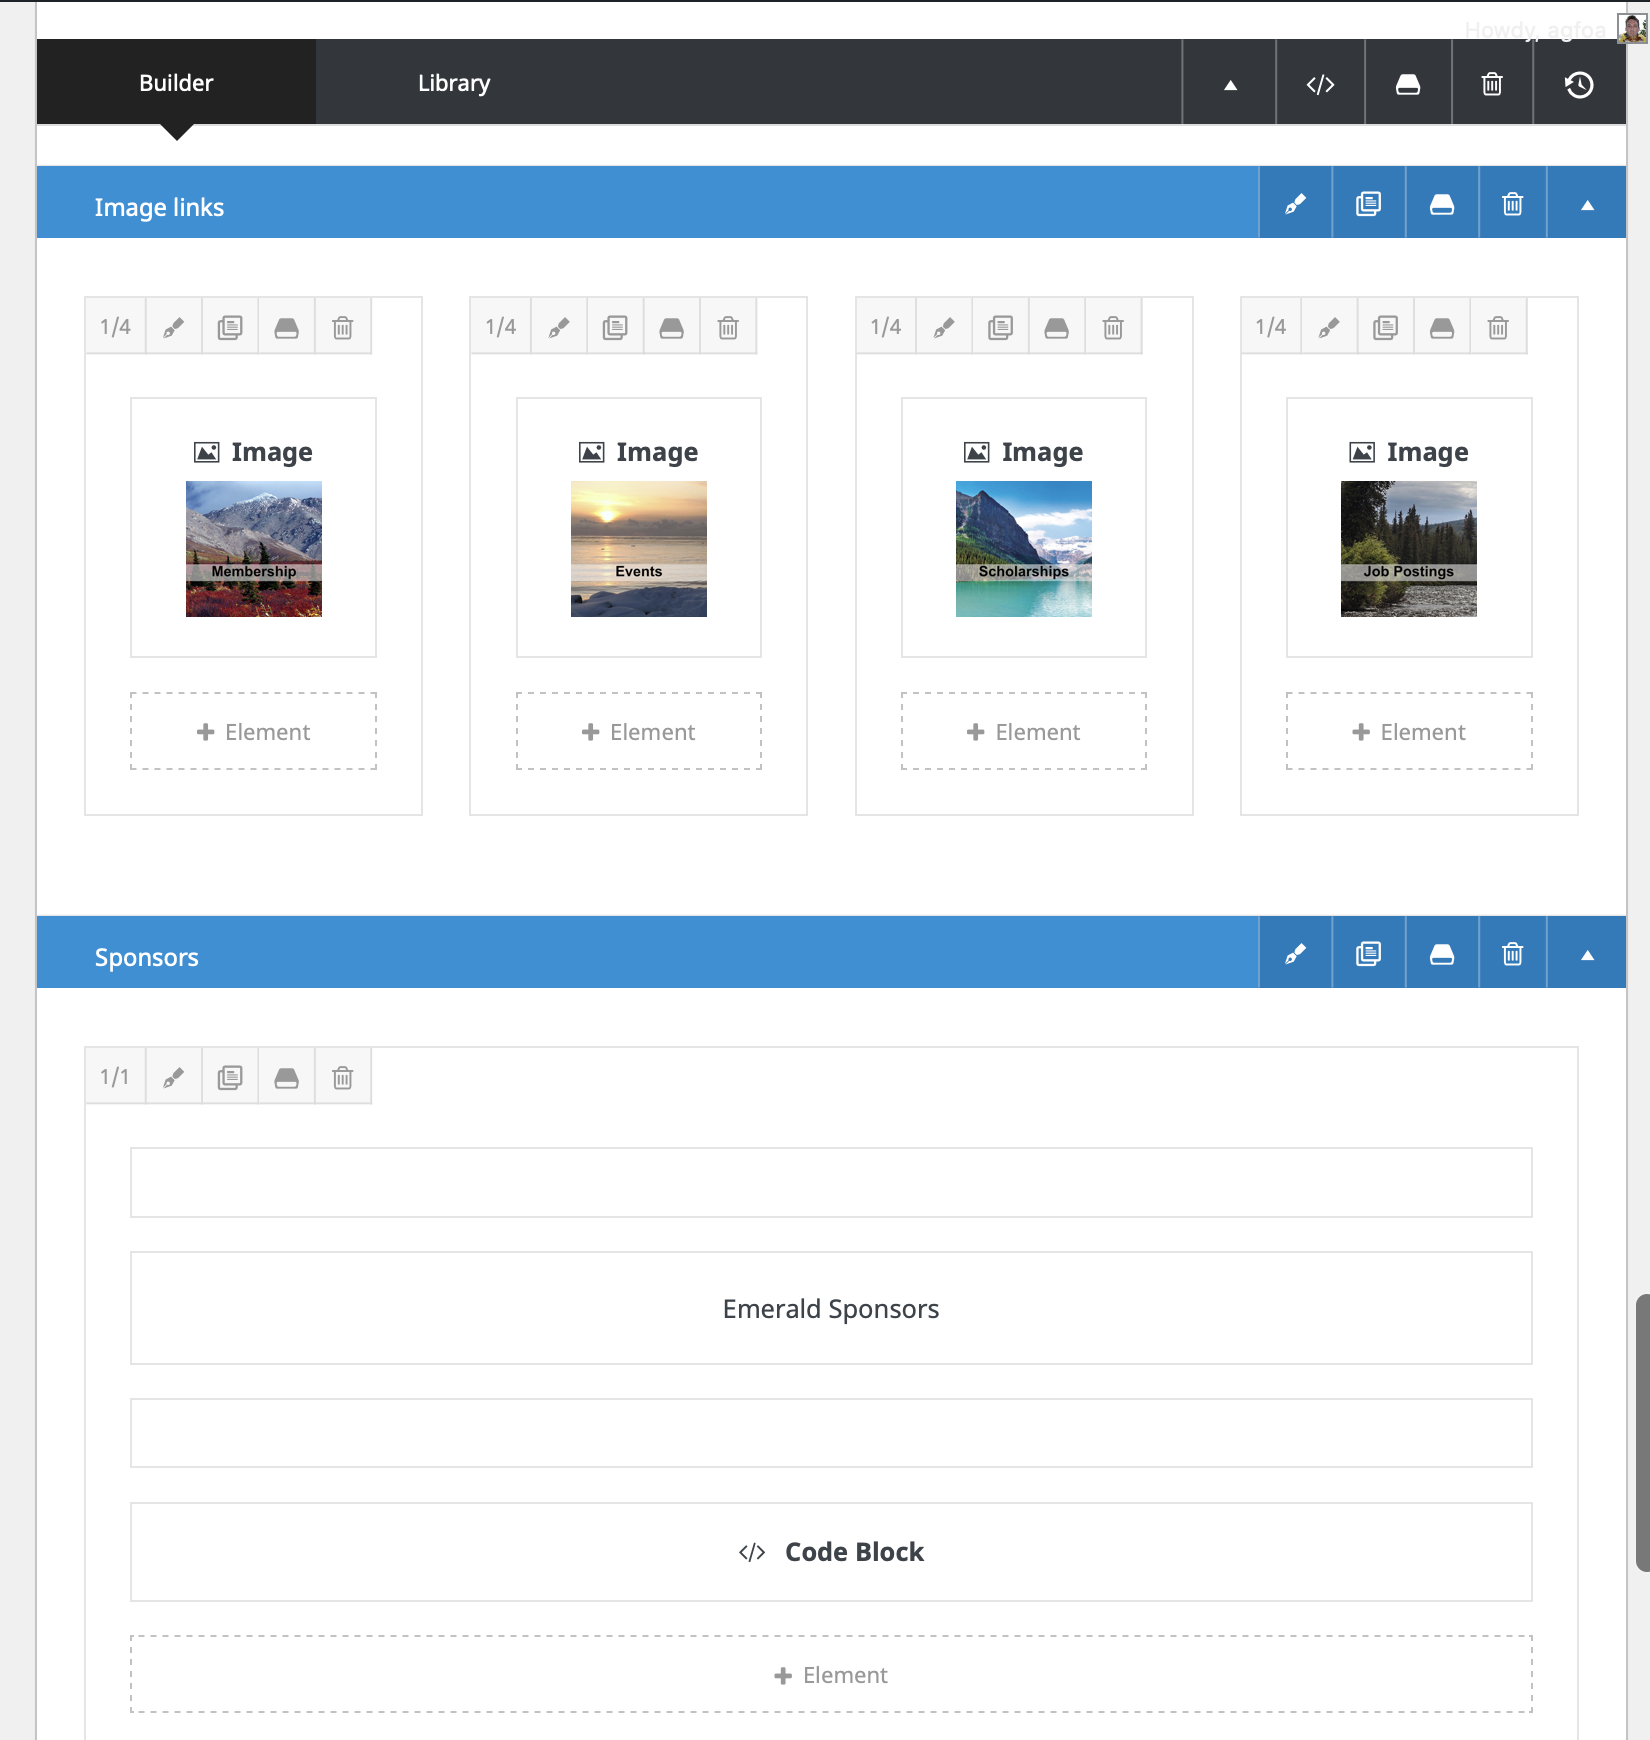
Containers are handy because they can help with organizing information on the page. Take a look at the backend of the AGFOA home page. Here are two containers. The first one, named "Image Links" holds four columns which each contain an element called "Image" with a picture. The second container, named "Sponsors" holds a single column title "Emerald Sponsors" and another single column called "Code Block". It contains some code that tells the page to only display logos of AGFOA's emerald-level sponsors.
Elements
We can examine an element by hovering our mouse over it and clicking the edit icon:
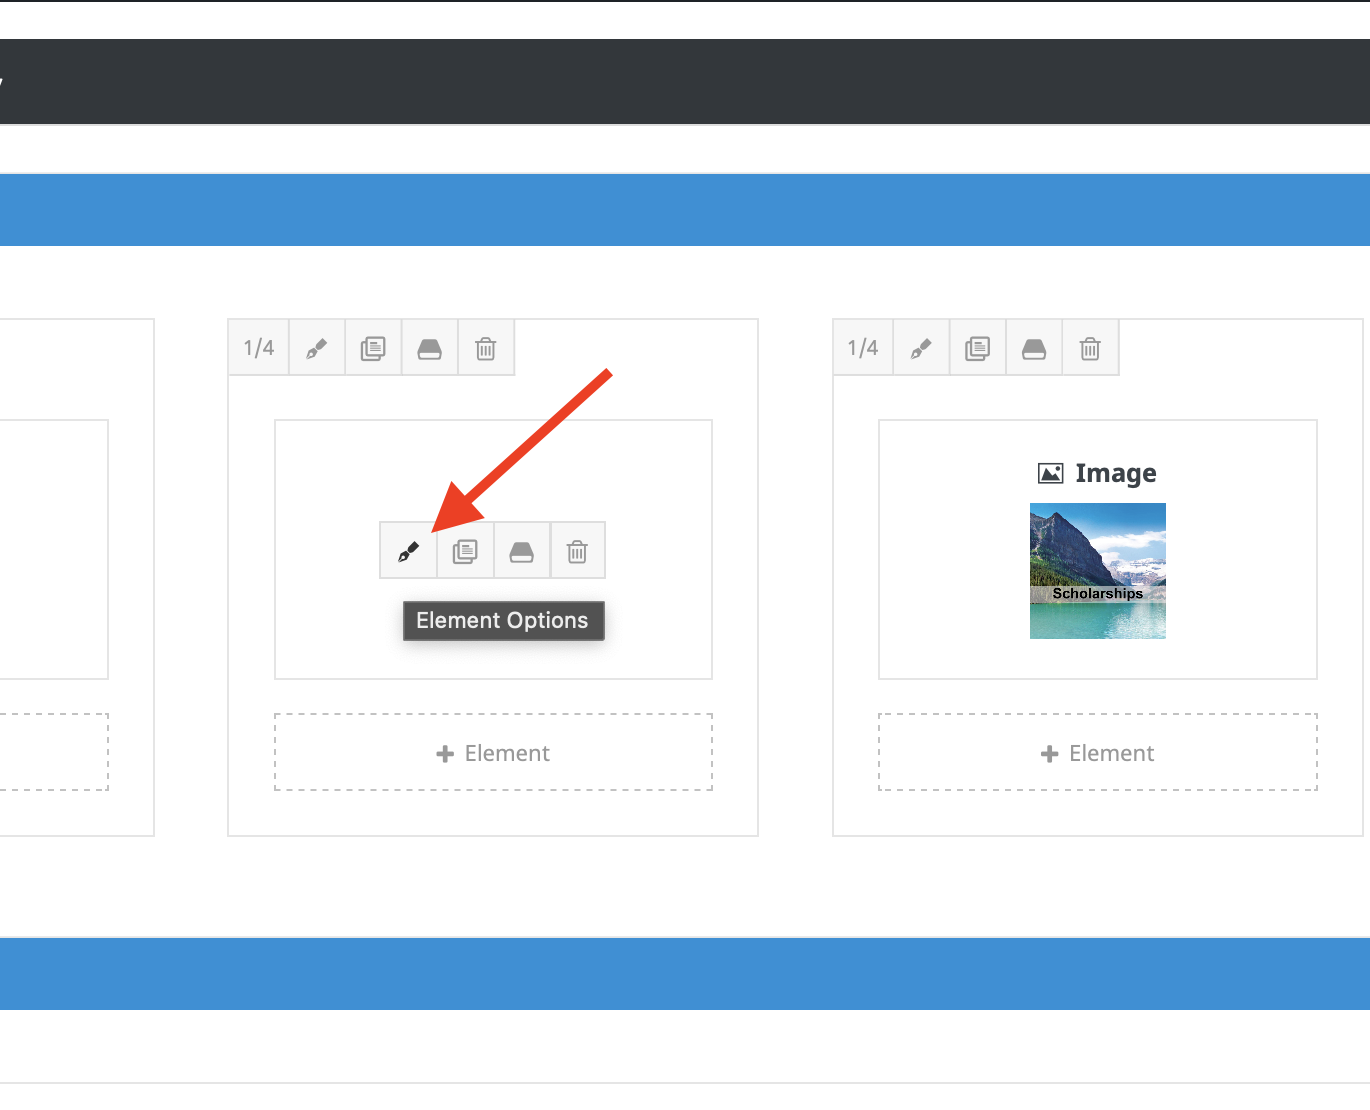
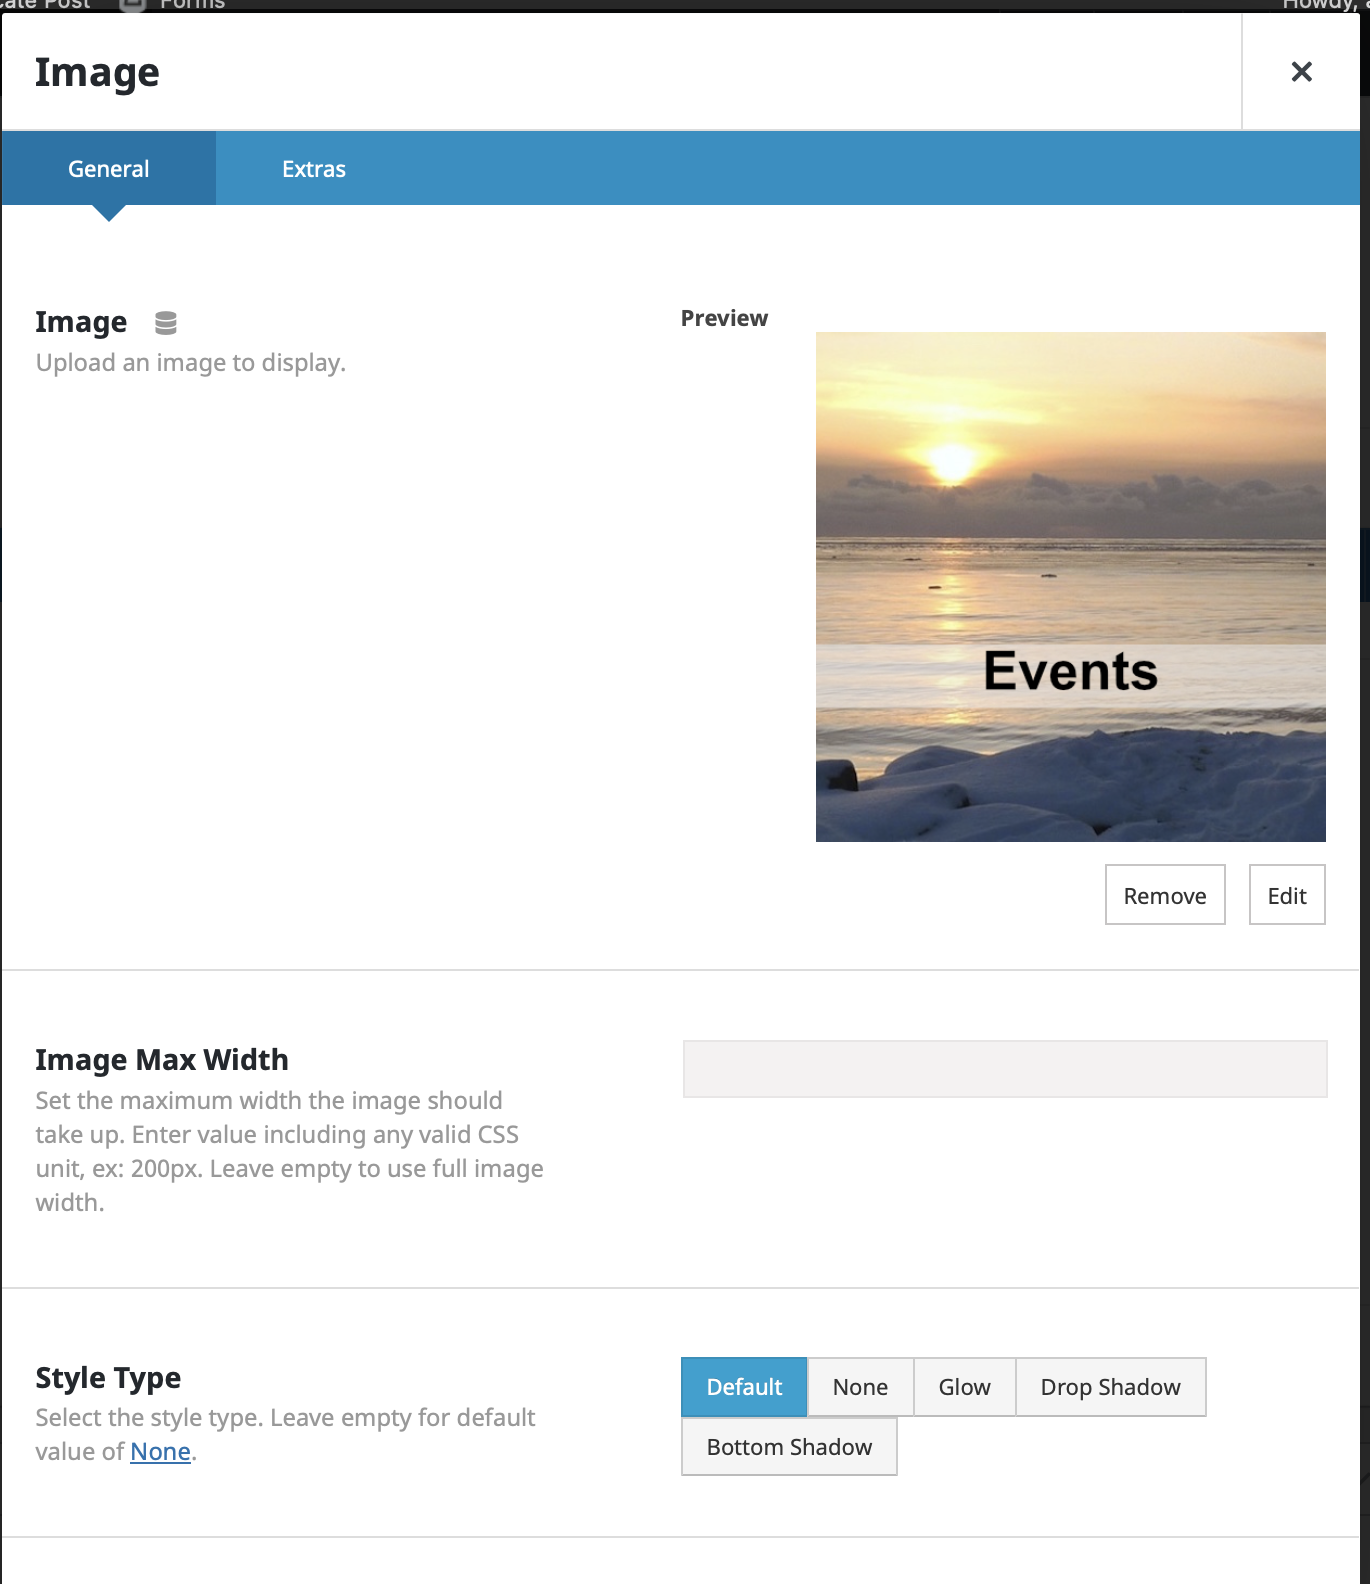
When you open the edit function of an element, it will look different depending on what kind of element (image, text, code) you are editing.
It is easy to get lost in Elements options. Most likely you want a Text Block, a Title Block, or an Image Block.
Most of the work of building a website in WordPress lies in creating pages, adding containers and elements, then populating those elements with content. It can seem overwhelming without some practice and a little trial and error. Concept of Degrees is here to help! We can create new content per your instructions, or sit down and work with you to help you build pages and content together. What follows here is just an overview of some key steps.
Making Changes
Editing Options
Editing Existing Content
Elements
Edit, Clone, Save, Delete
Copying and Modifying
Creating from Scratch
Adding Media
Posts
Job Postings
Other Posts
Editing Options
We have three key options in editing content. We can
- Edit the existing content,
- Copy existing pages, containers, and elements and then modify them, or
- Create new pages, containers, and elements from scratch.
Editing existing content
If you just need to update words or images, this is most straightforward. Just find the element that you want to edit and hover your mouse over it. You should see the element change to something like this:
Inside every container, there are a specified number of columns. In the example above, the first container has a single column, the second container has four. Look in the upper left corner of the column to see what size it is. The single column is 1/1, the four columns each are 1/4.
Elements
Elements are the components within a container that display content. When building a web page, you choose which elements go into a container. Elements can be images, text, titles, code, even just empty space, or a line to help visually define a space. You can put as many elements in a container as you want. Elements will conform to the containers that they are in.
In this example, there are two elements in a container with a single 1/1 column. The first element is a Title box, the second element is a Text box.
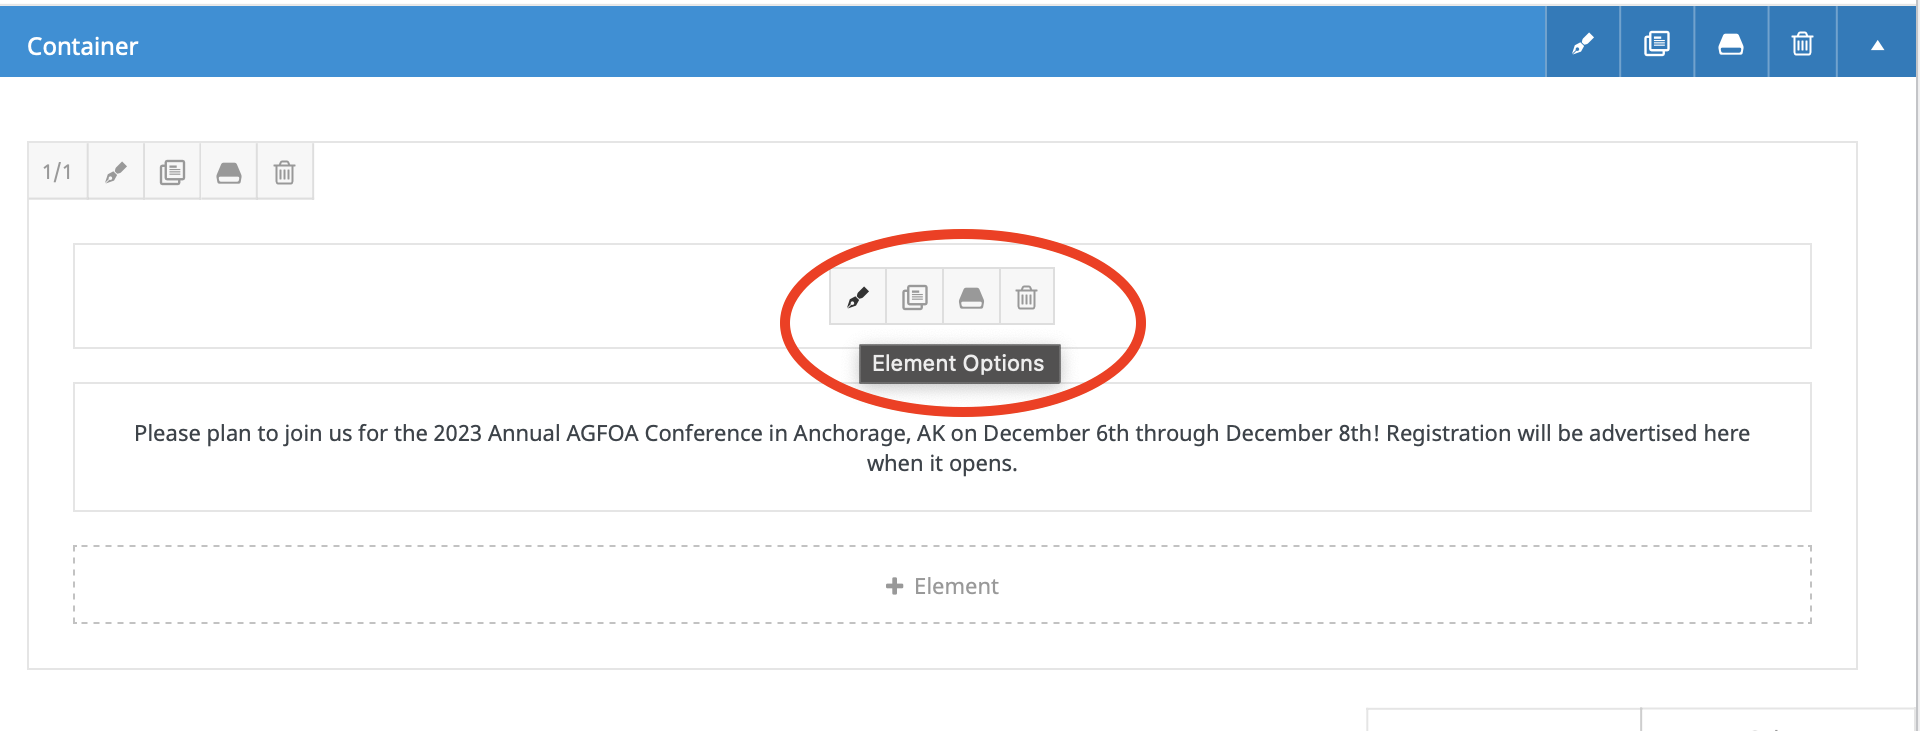
There are four options on this menu. Taken in order of the icons, they are:
Edit, Clone, Save, Delete
“Edit” is what we will discuss now. “Clone” is coming next. “Save” is an option to save the element and its content and settings in a file to call up later. This is a pro-level option that can come in handy, but we’ll leave that for now. “Delete” will do just what you think it does.
Clicking Edit will open up the options for the element. In this case, we are opening up the a Title box. Here’s what that will look like:
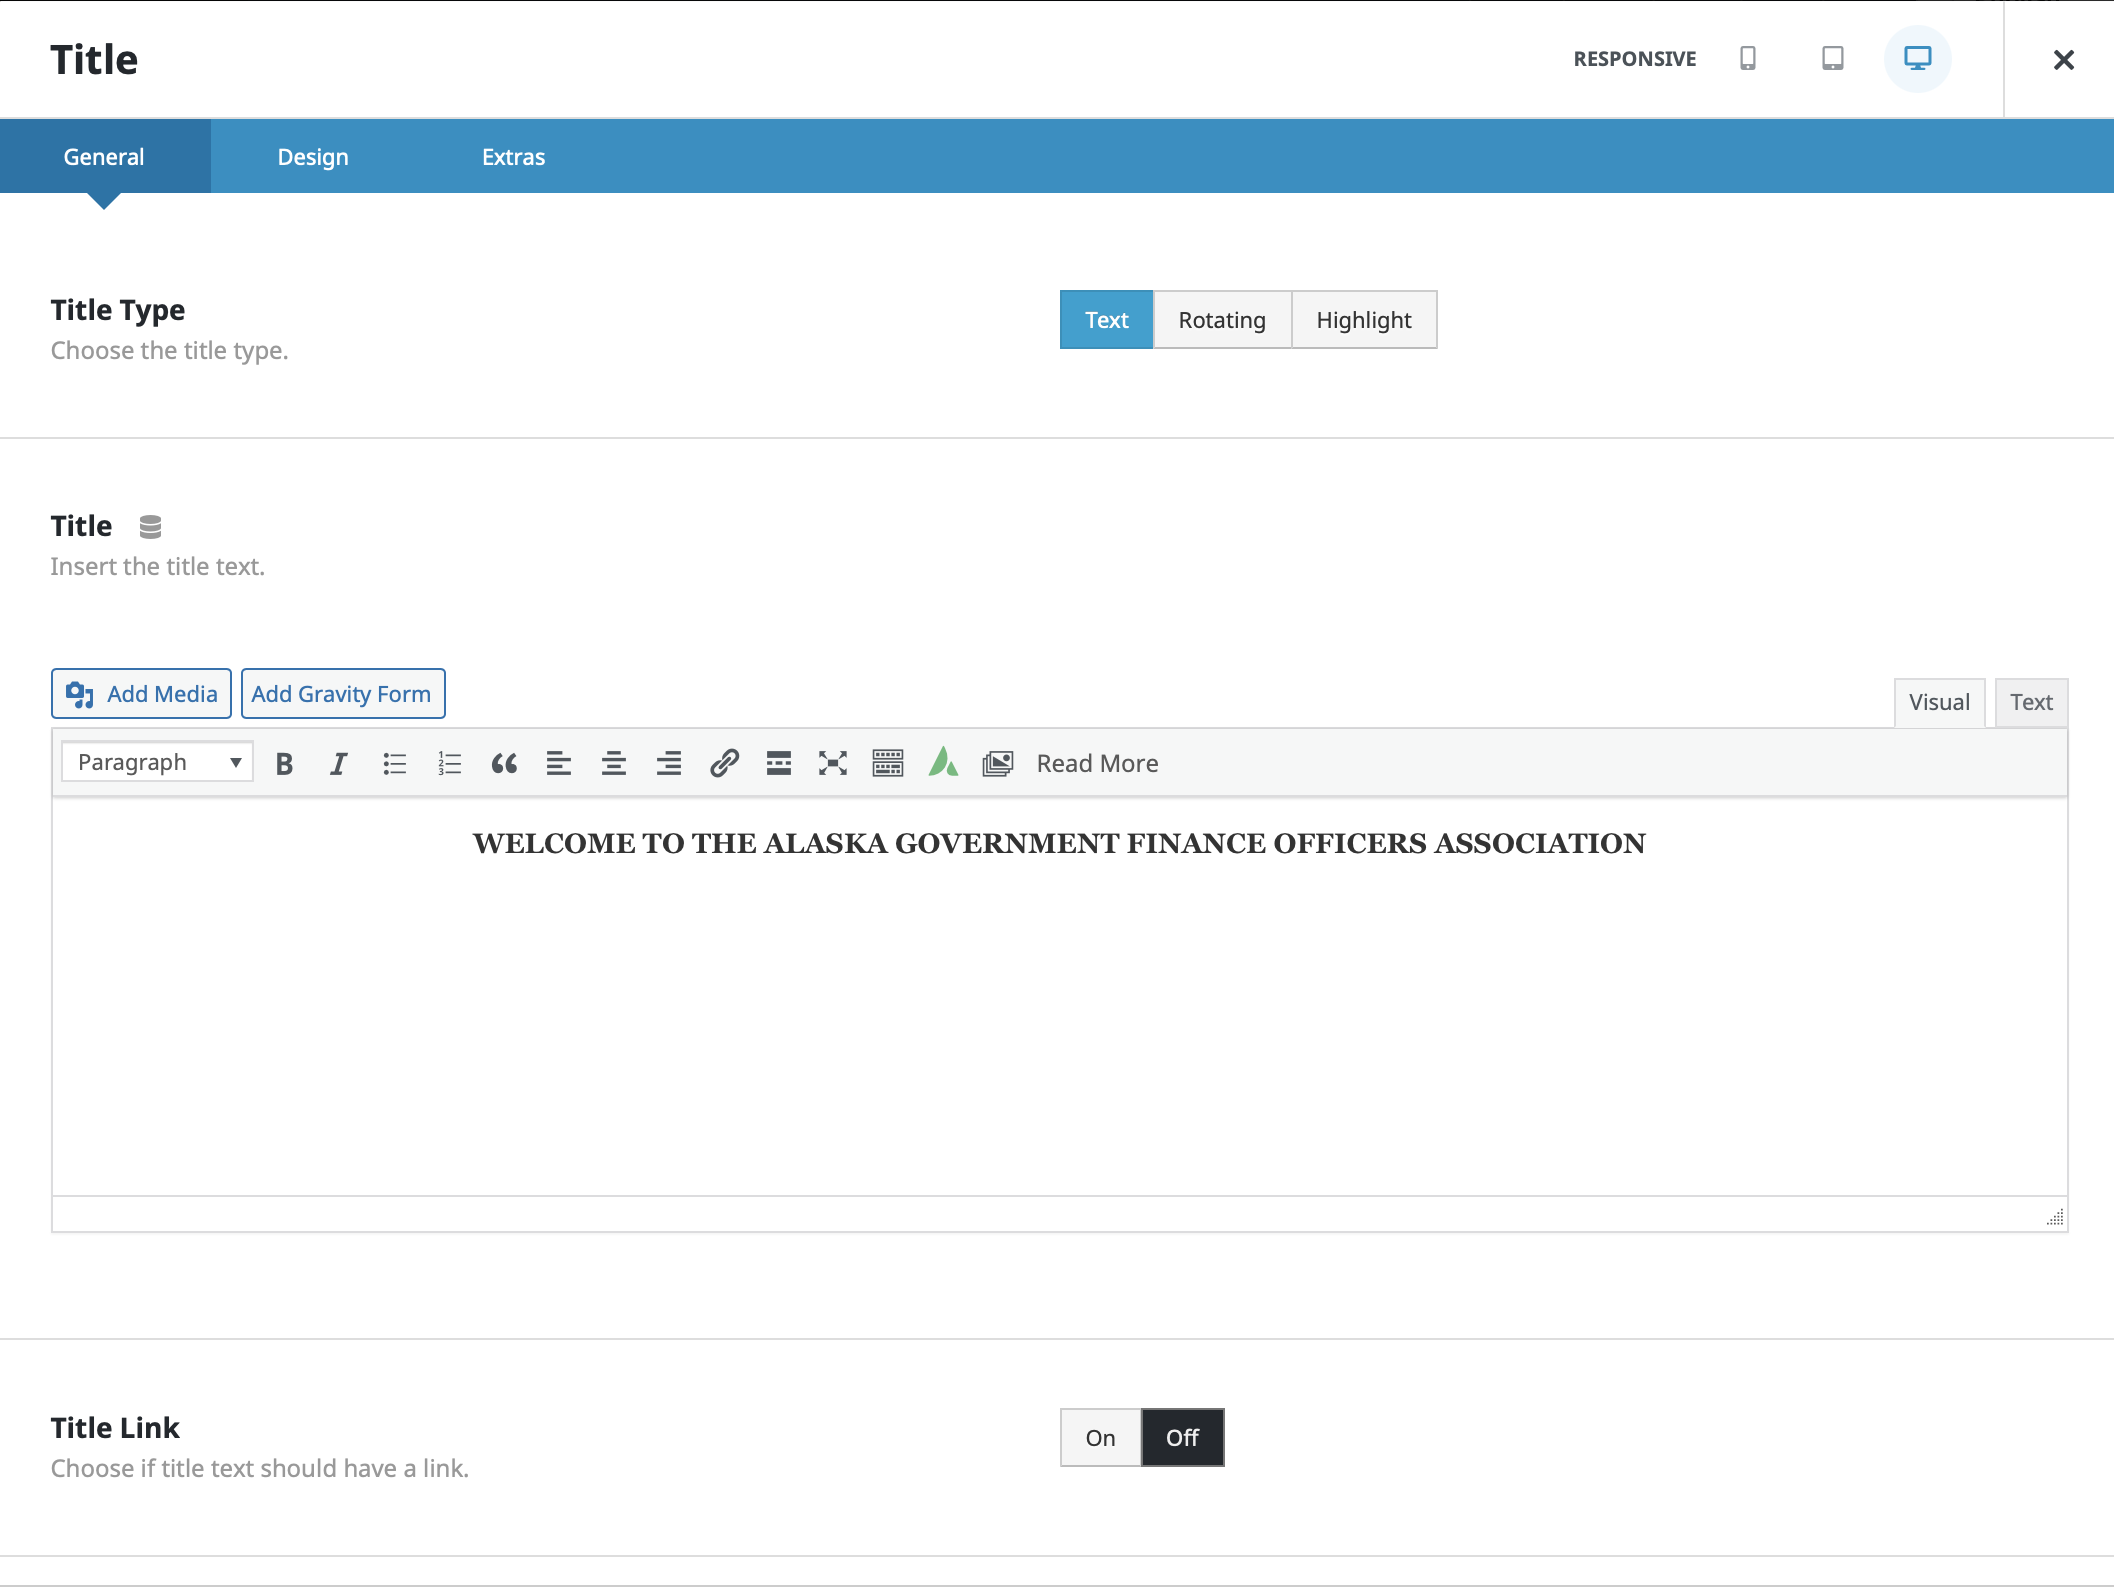
There are a lot of options here, but the basics are that you can edit what you see in the text box, and those changes will appear on the front page.
Copying and Modifying
A quick way add a new element, but with similar formatting and styling as other elements on the page is to Clone it. Clicking the “Clone” icon will create another element. You can drag and drop that element into a different container on the page, then edit accordingly.
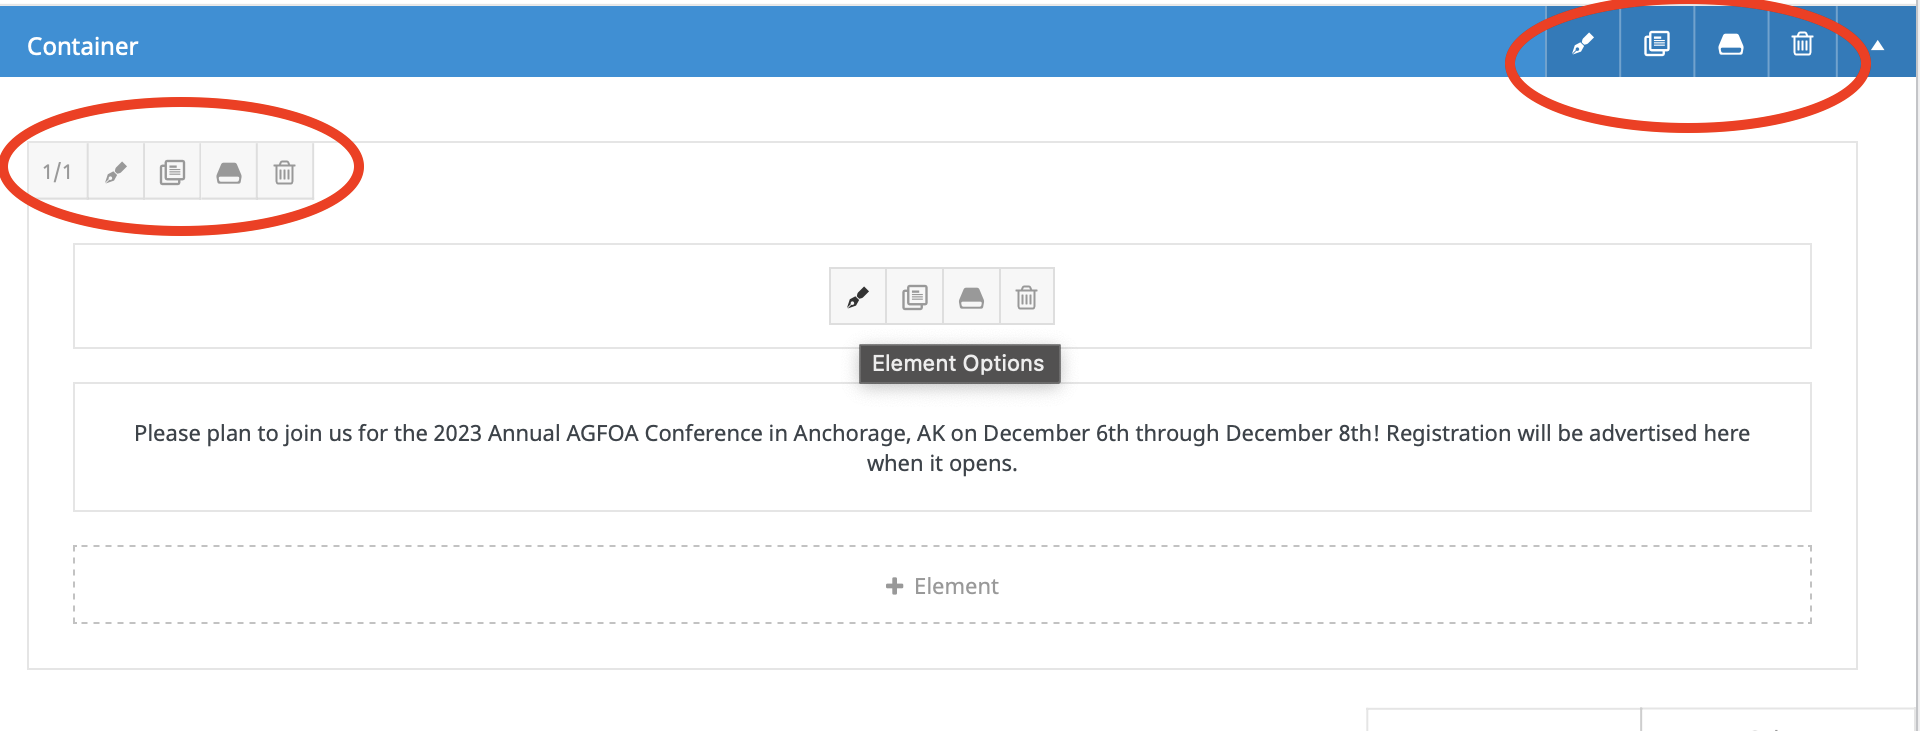
You have seen where the Clone option is for an element, but you can also find this option for columns and containers:
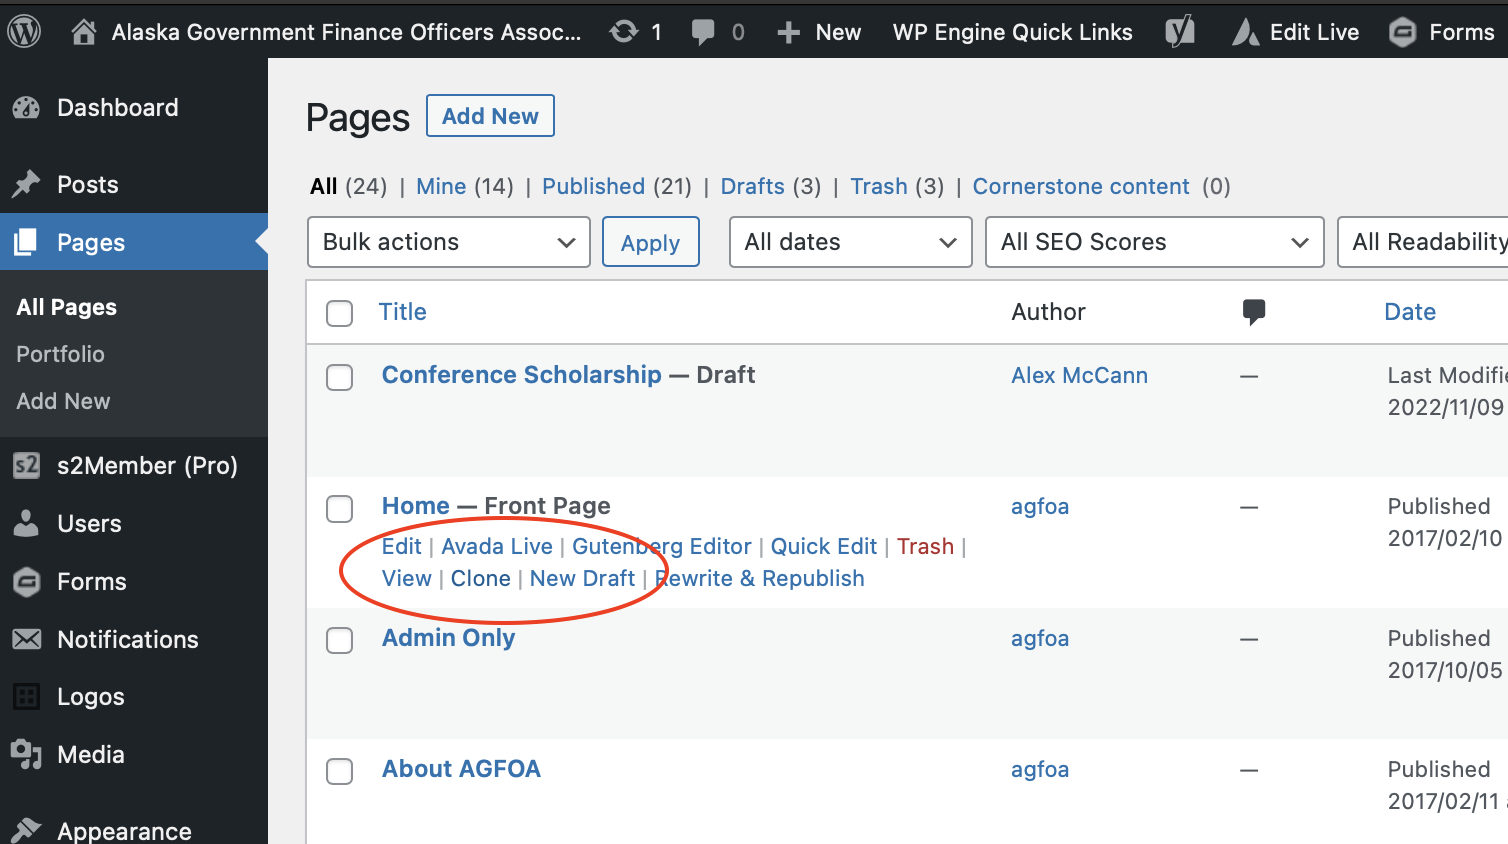
Cloning a page is a great way to safely experiment with making changes without the risk of making a mistake that you can’t work back from. From the Pages link on the Dashboard, hovering the mouse over a page title will give you a clone option:
Want to turn static information into dynamic content? A great feature with Avada containers is the ability to “hide” them from showing on the front end. This can be handy, if, say, there is an upcoming annual conference that requires a lot of information and formatting on the back end, but you only want it visible on the front end at certain times of the year. If all that information is in a container, you can take these steps to determine when to hide and when to show it.
Choose a container, then “Edit”. You will see a screen like below. Scroll down until you see “Container Publishing Status”
Creating From Scratch
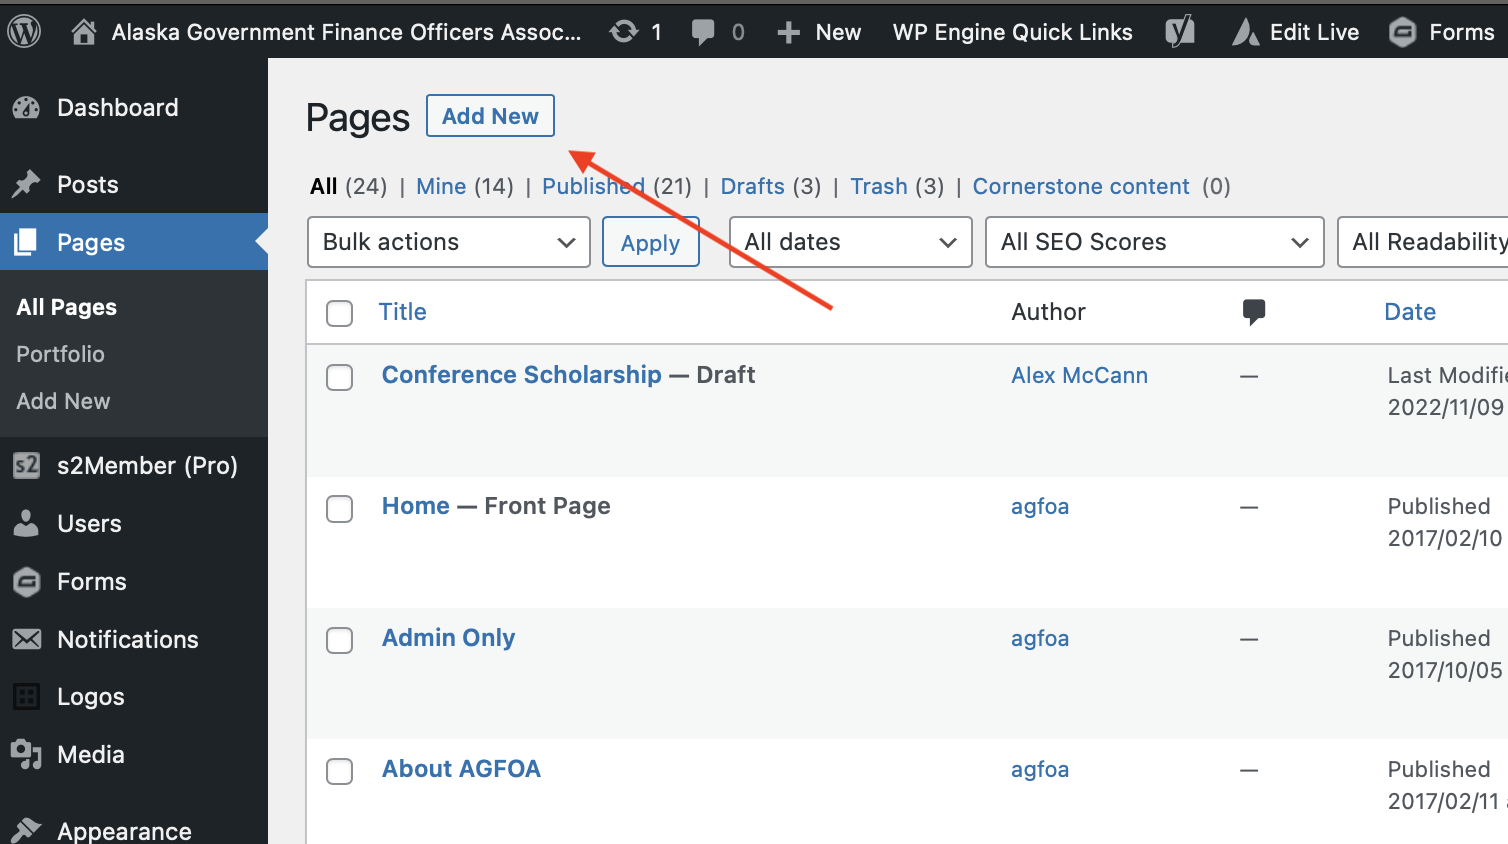
To create a new element from scratch, you just need to know where the “Add New” button is.
For a new page:
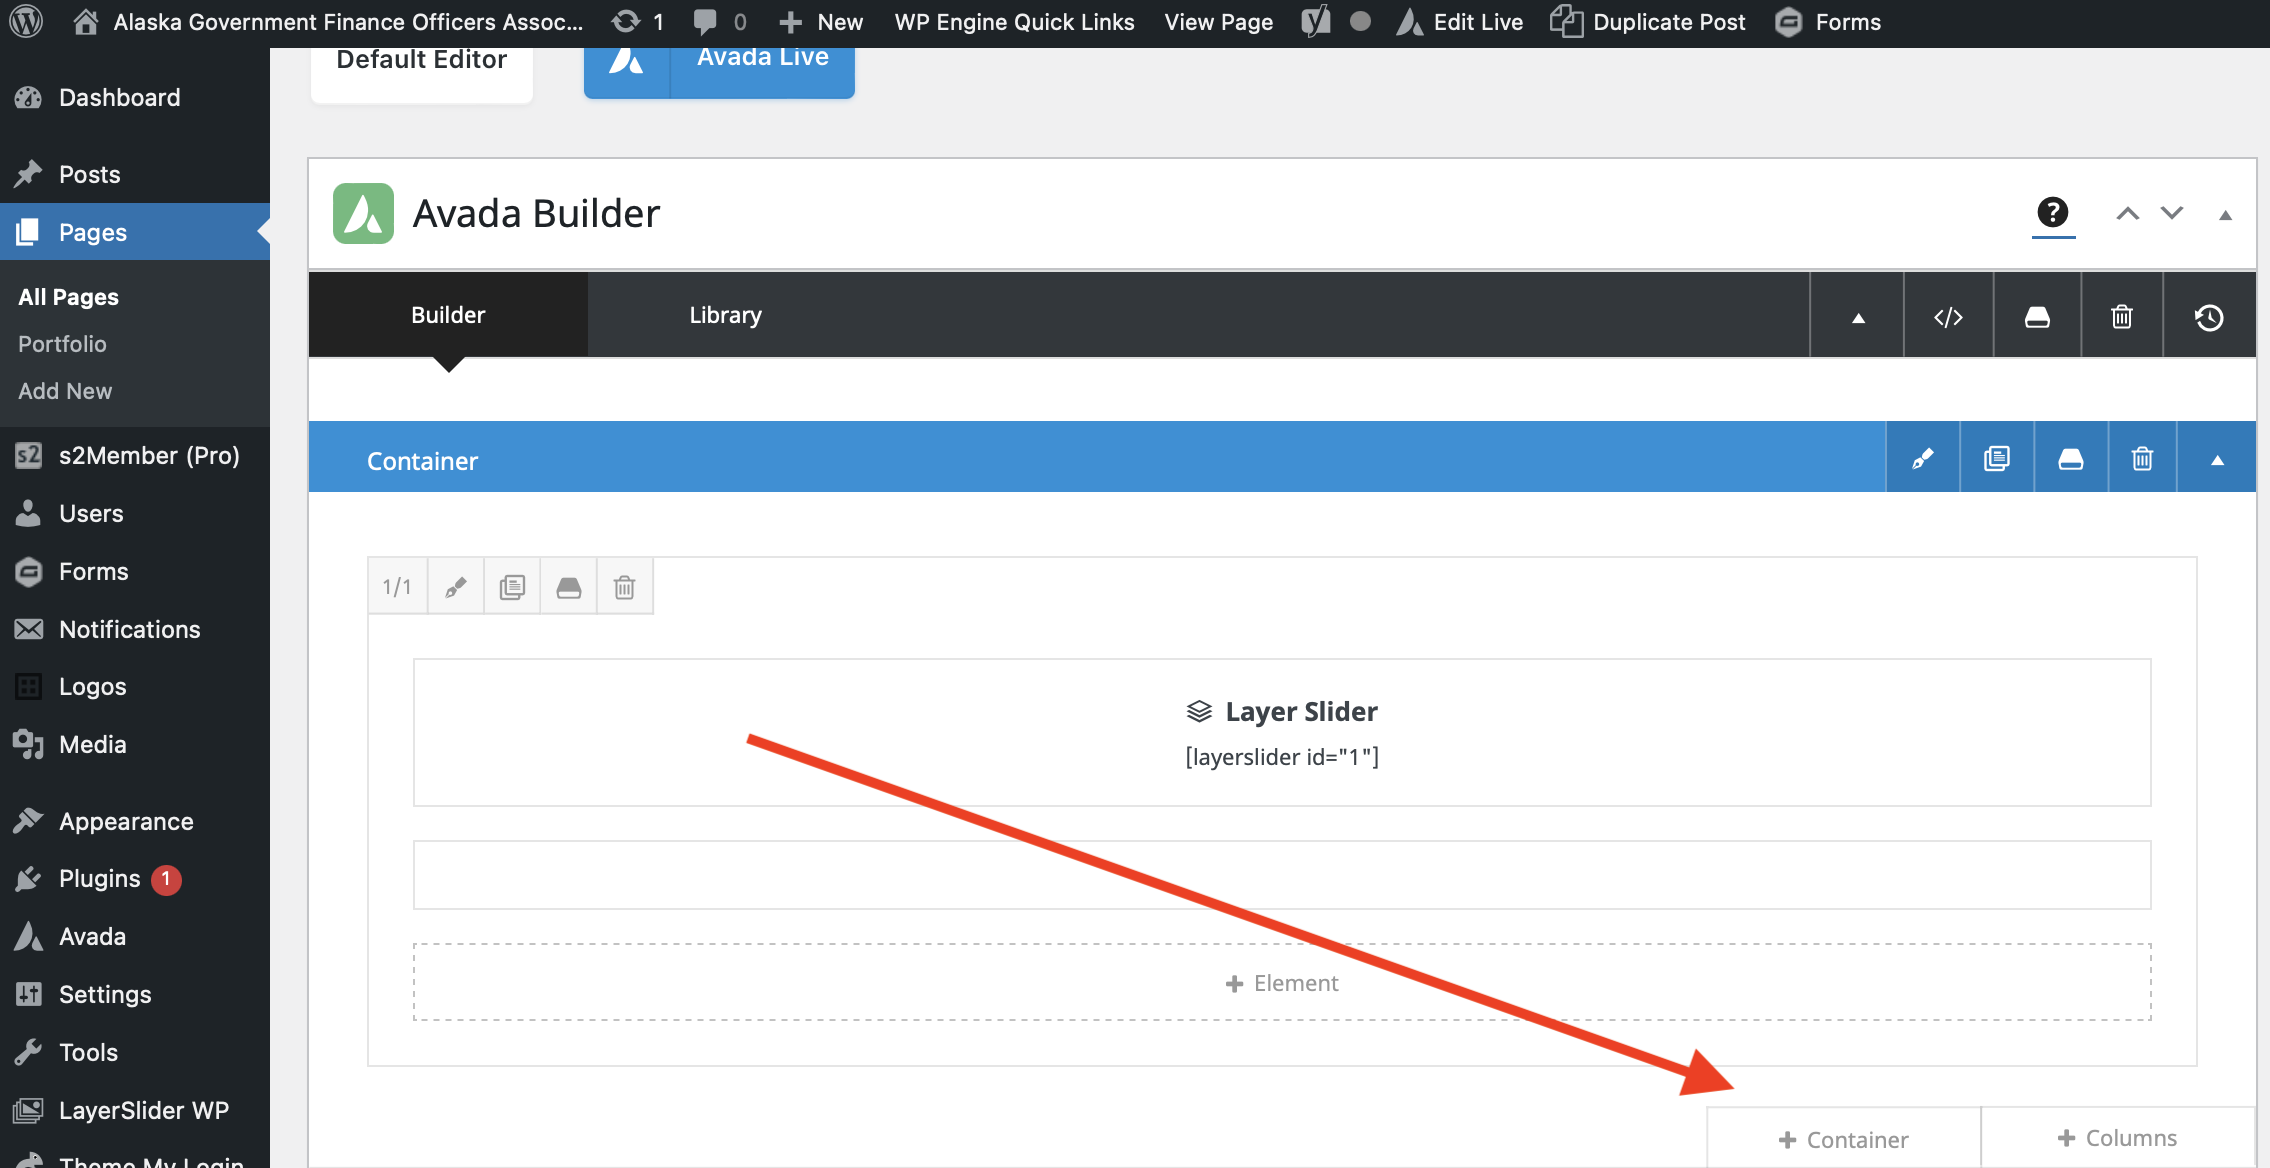
And for a new element, look for thing/Showing Containers
For a new container or element, hover over a container and look for these:
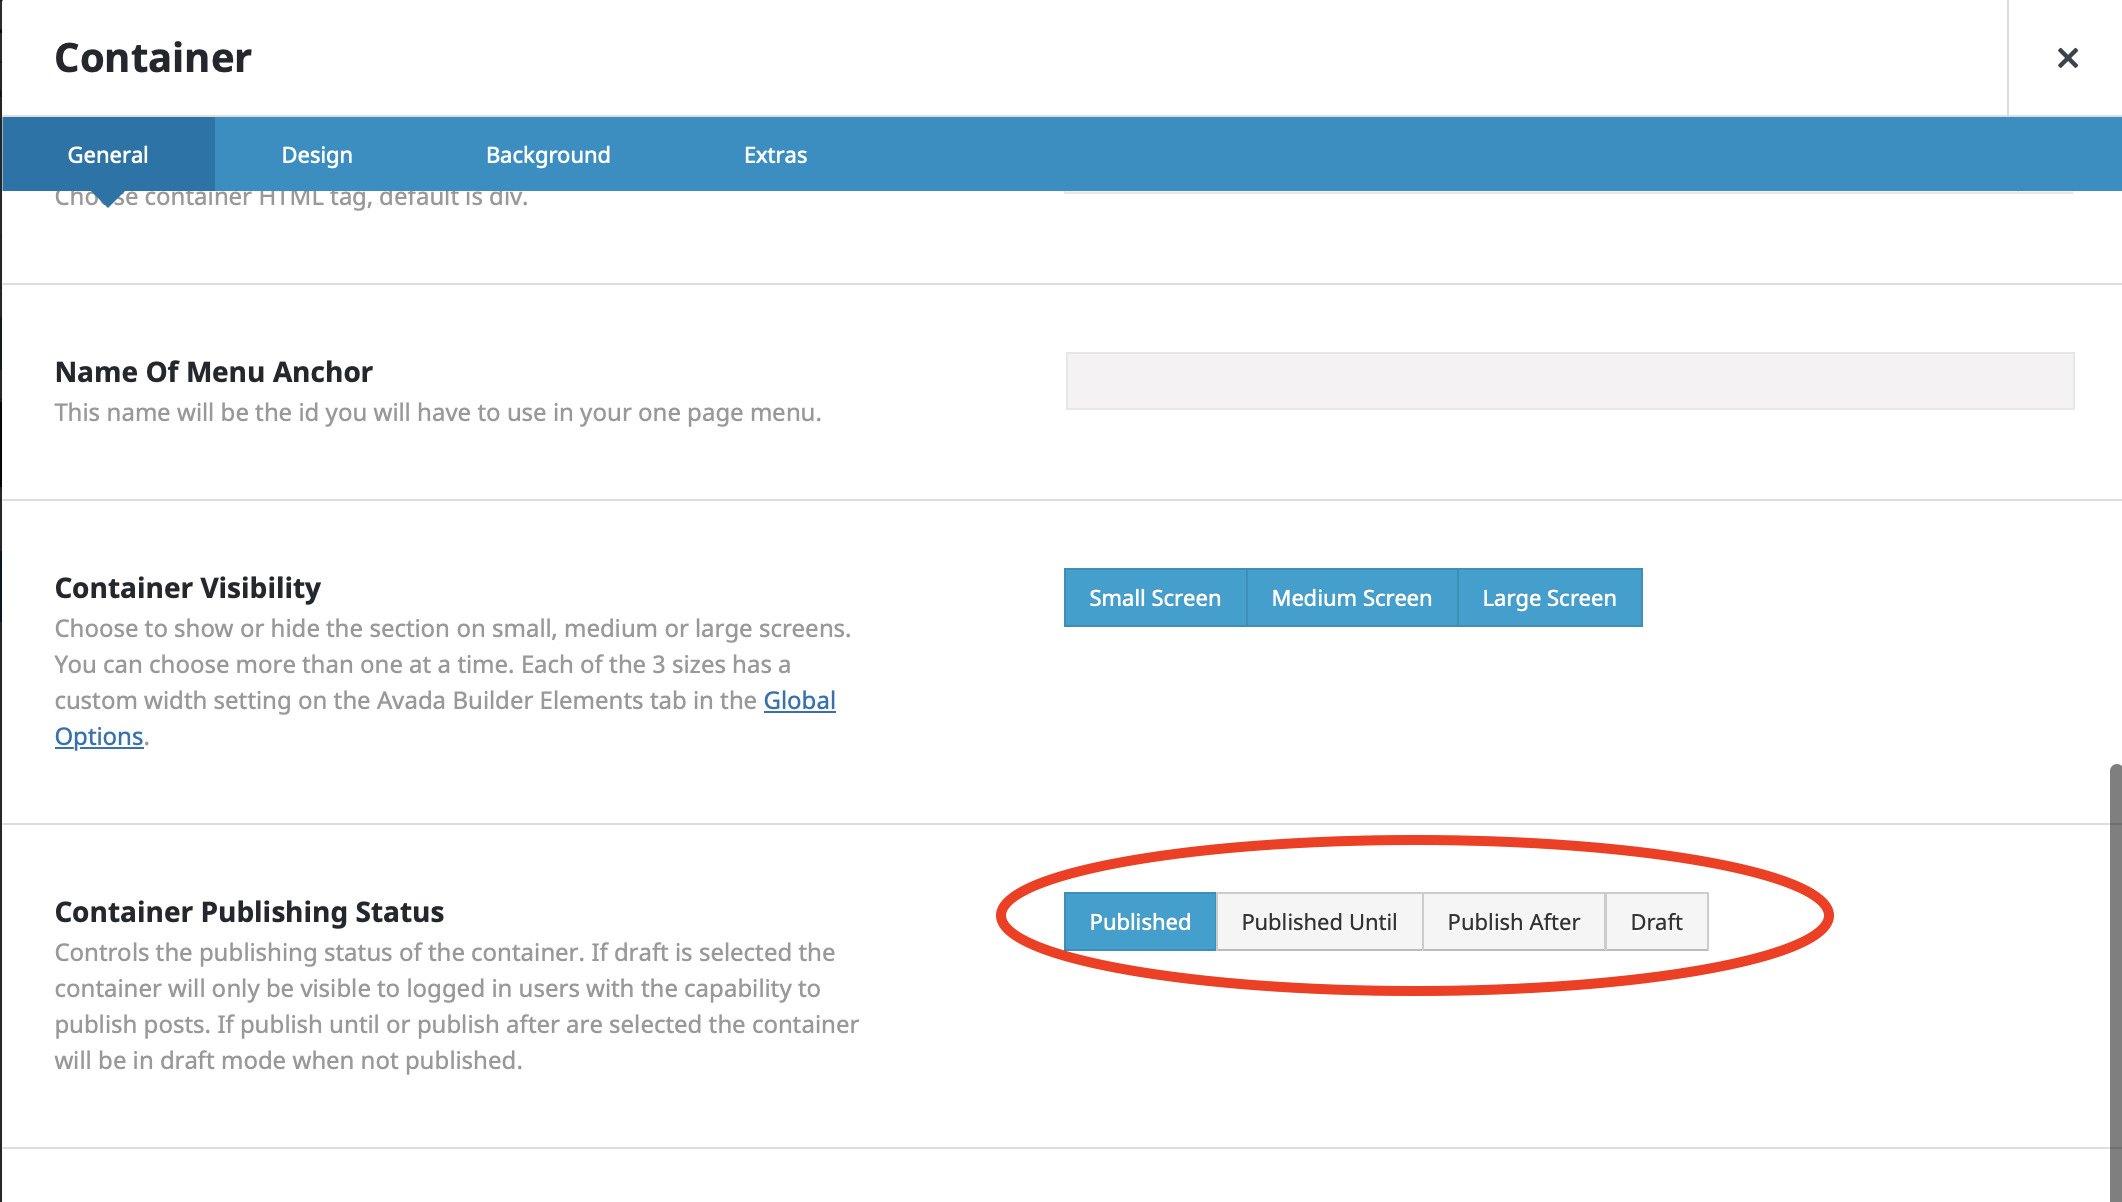
Choosing “Draft” will allow you to work on the container, but it won’t show on the front end until you choose “Published”.
Publish Until and Publish After will give you date options. Publish Until will move the container to Draft status after a certain date (great for ending an announcement about early registration, for instance). Publish After will set the date that the container will be public, great for when you have the content ready, but don’t want it to be viewed for a while.
Posts
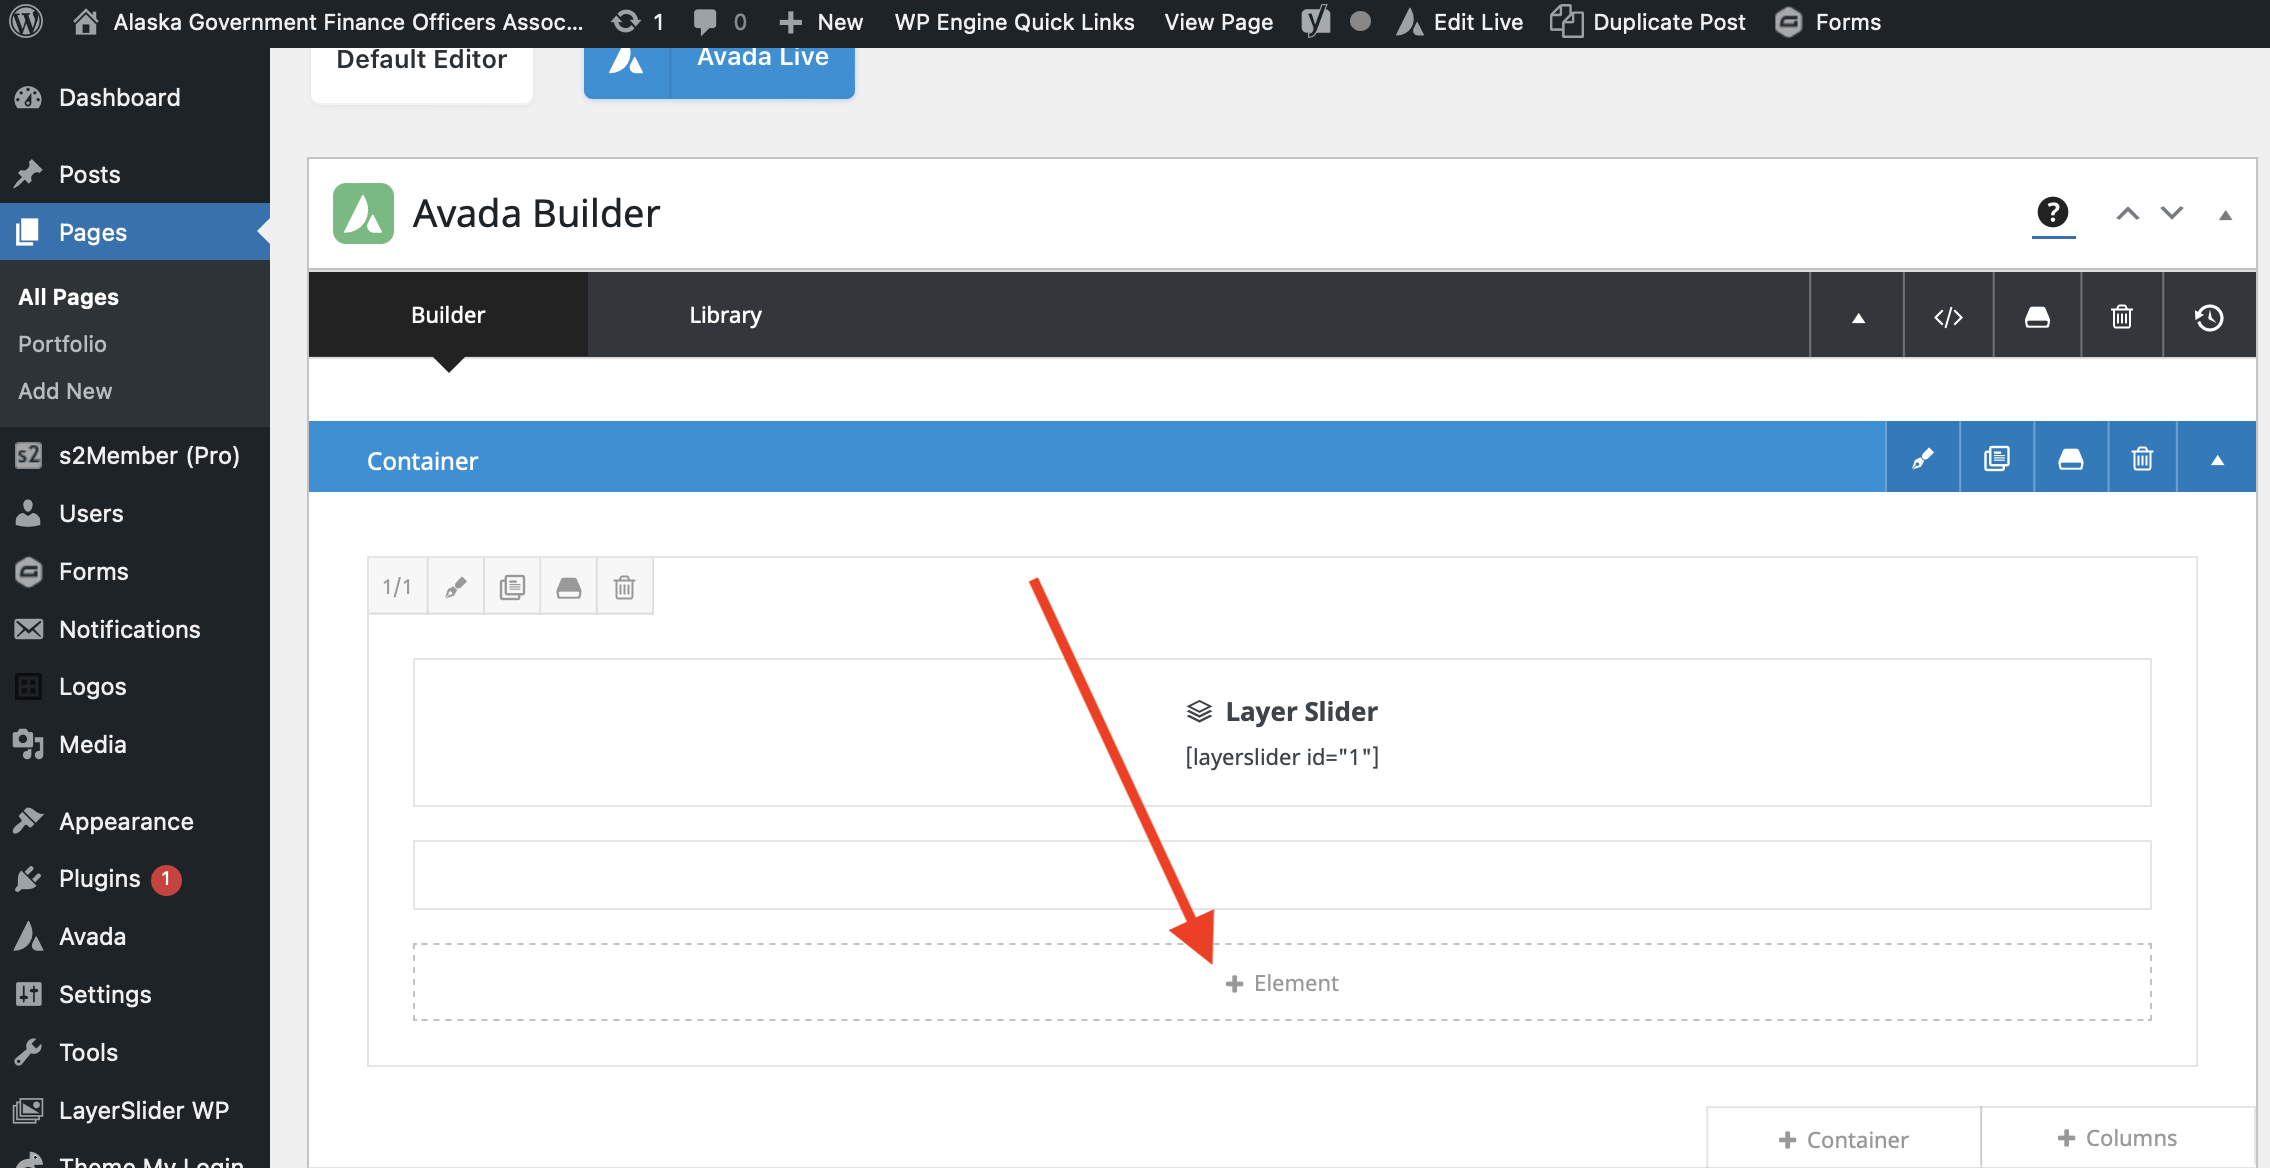
Posts are dynamic content. Putting information into a post allows you to choose where, when, and how post content shows on the front end. Currently the AGFOA site is using posts for the job announcement page.
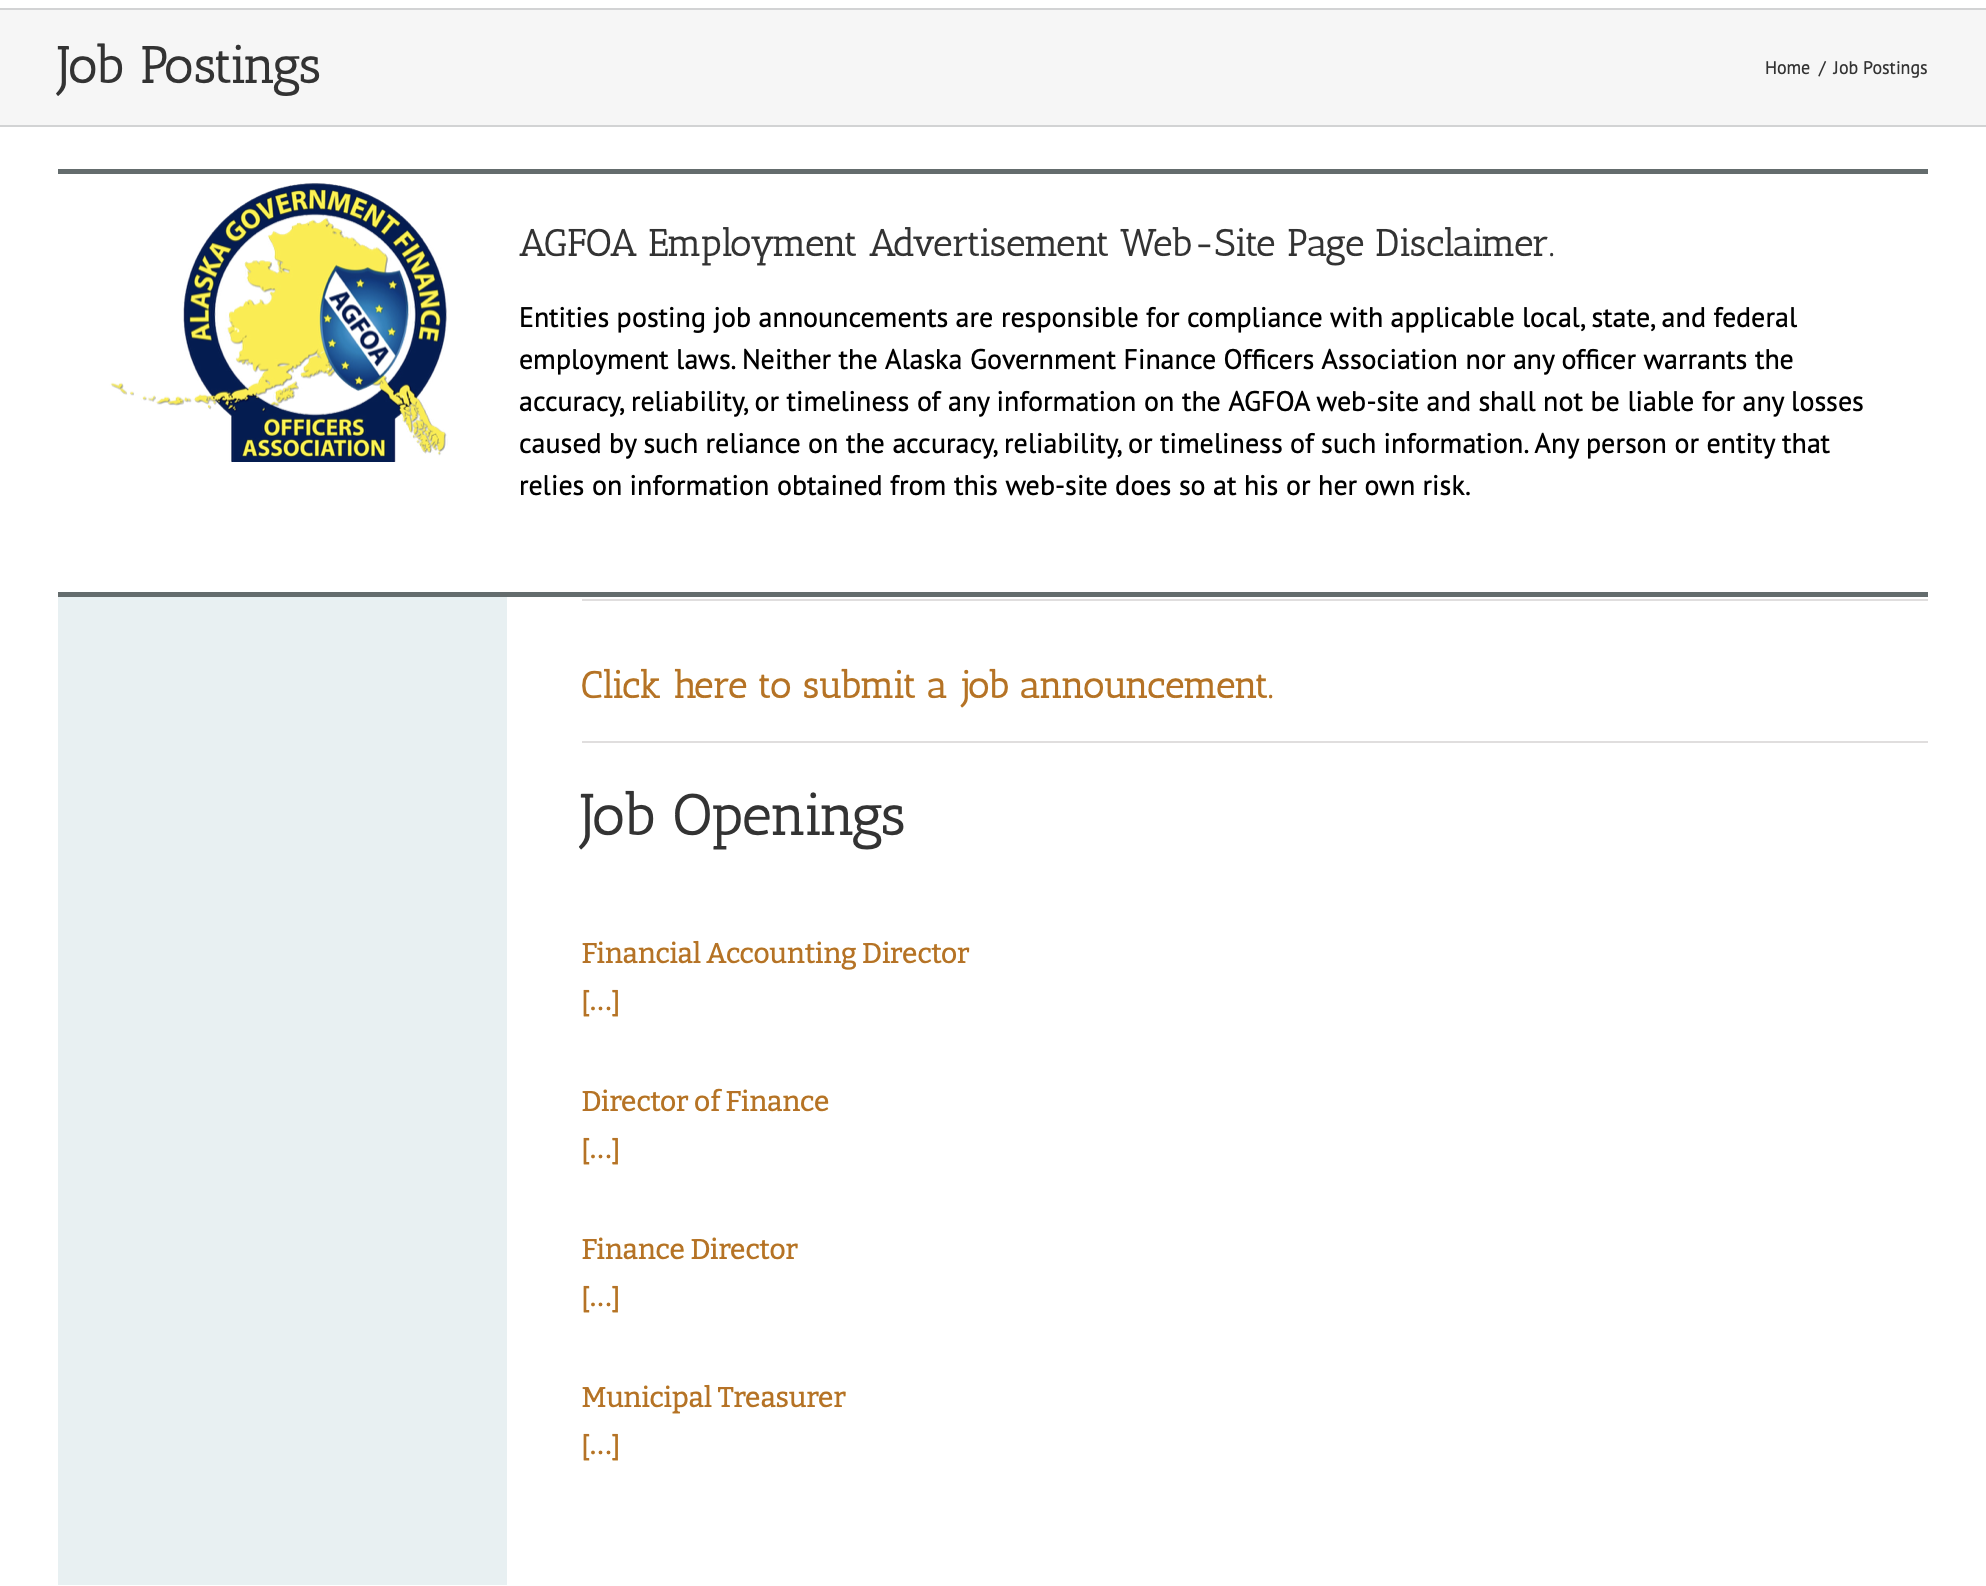
From the back end, it looks like this:
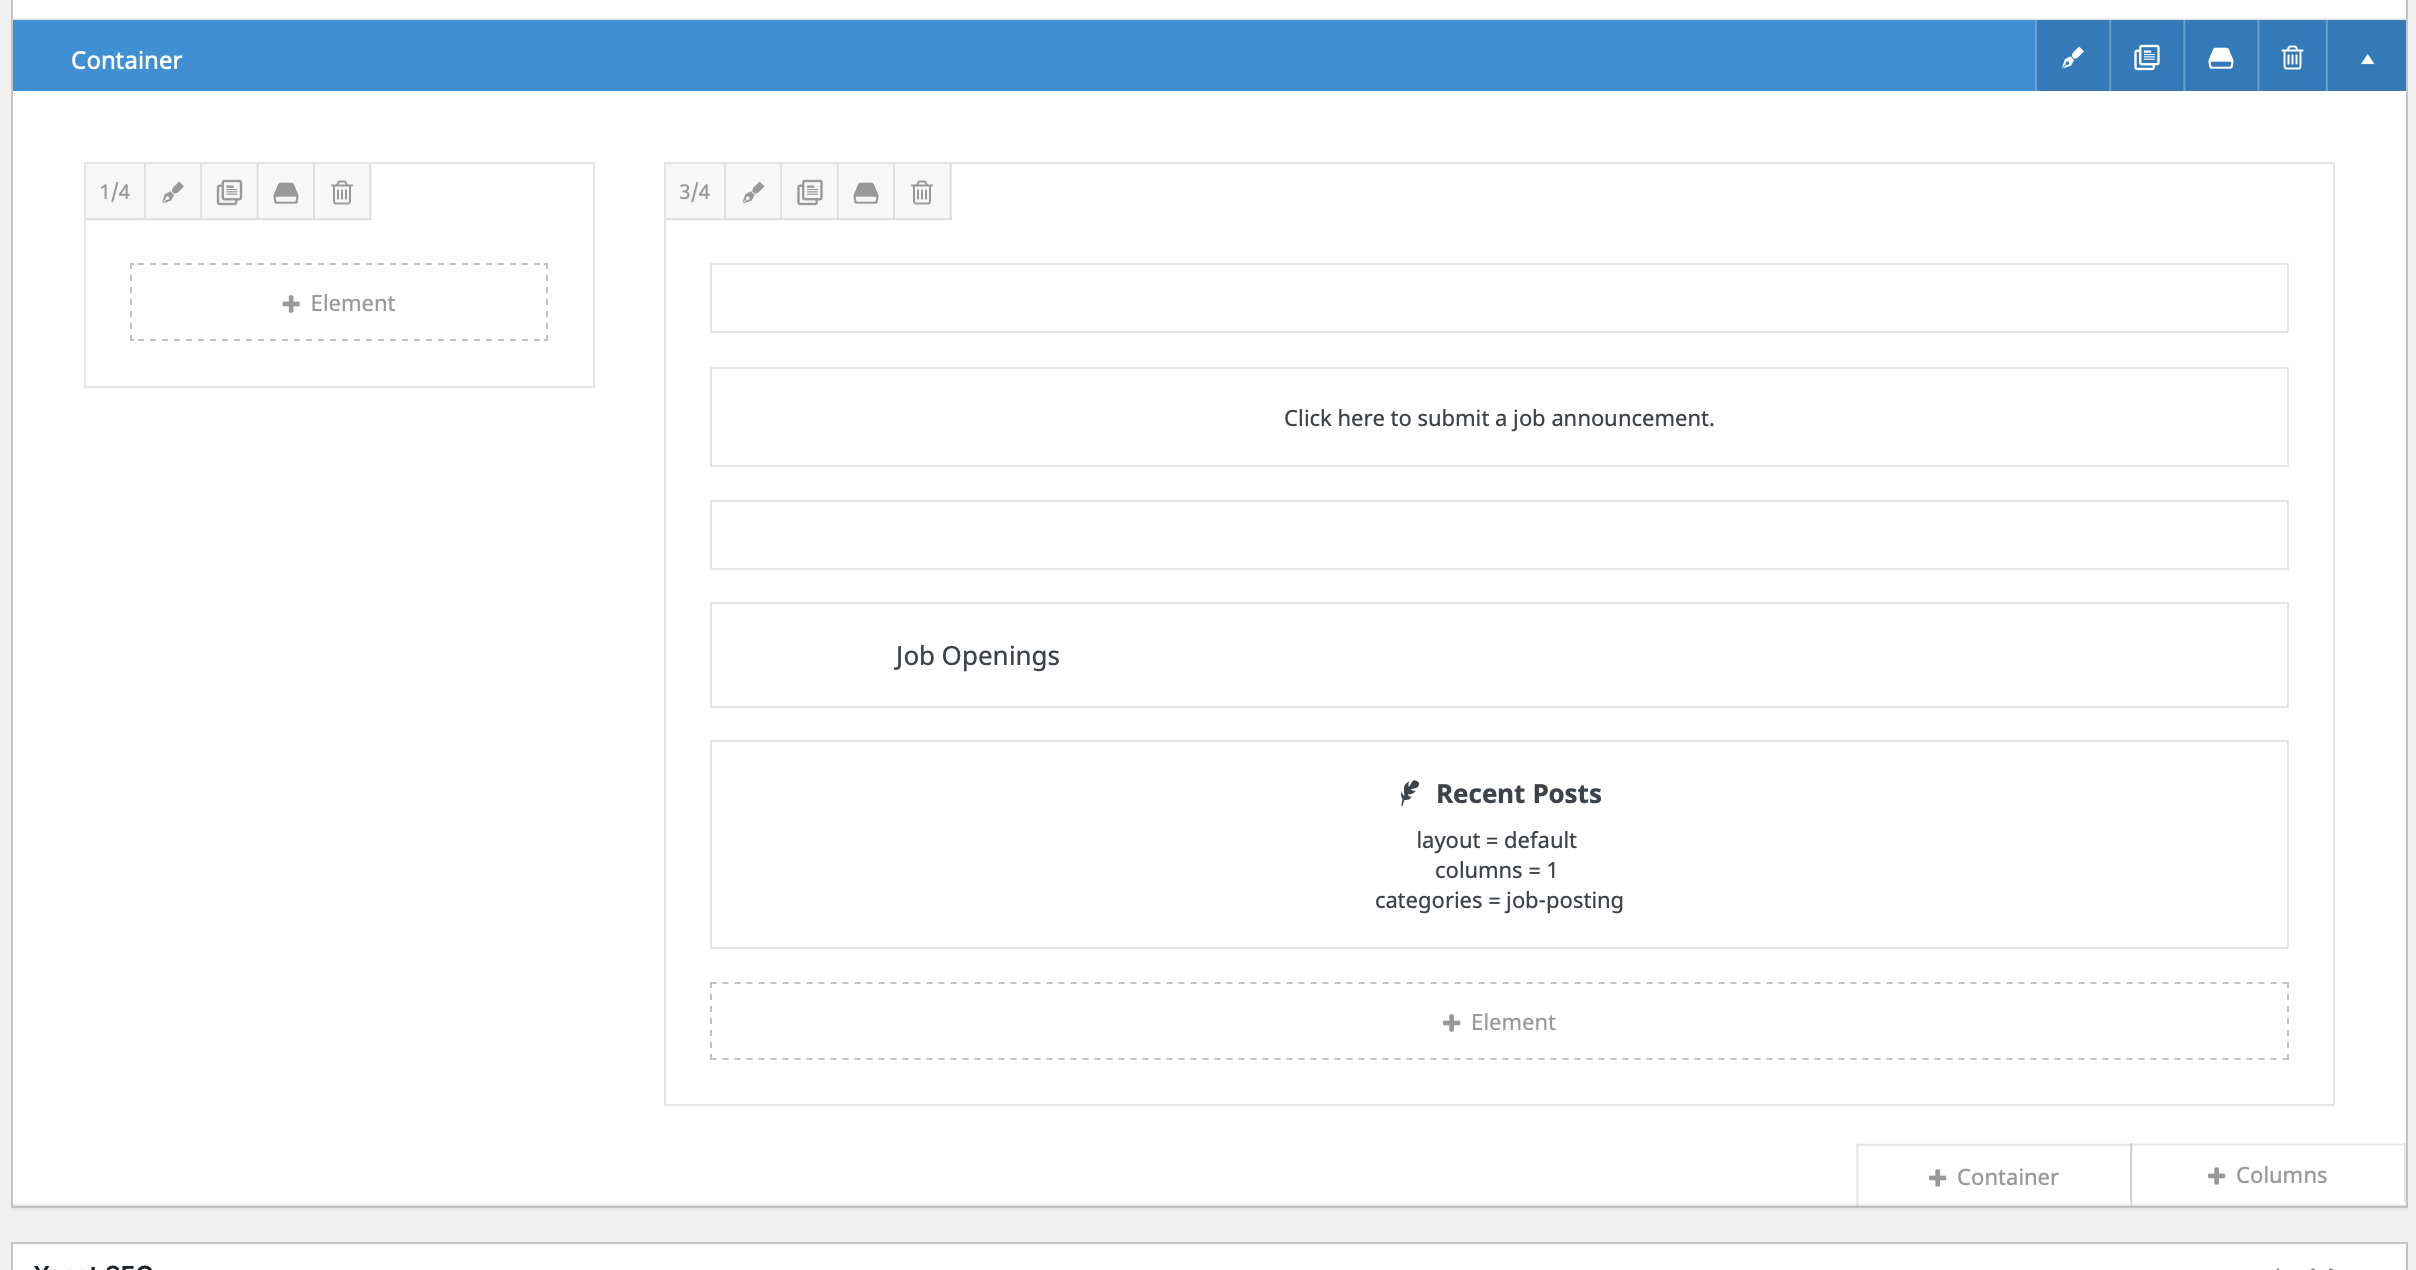
Digging deeper, and looking into the “Recent Posts” element, we see this:
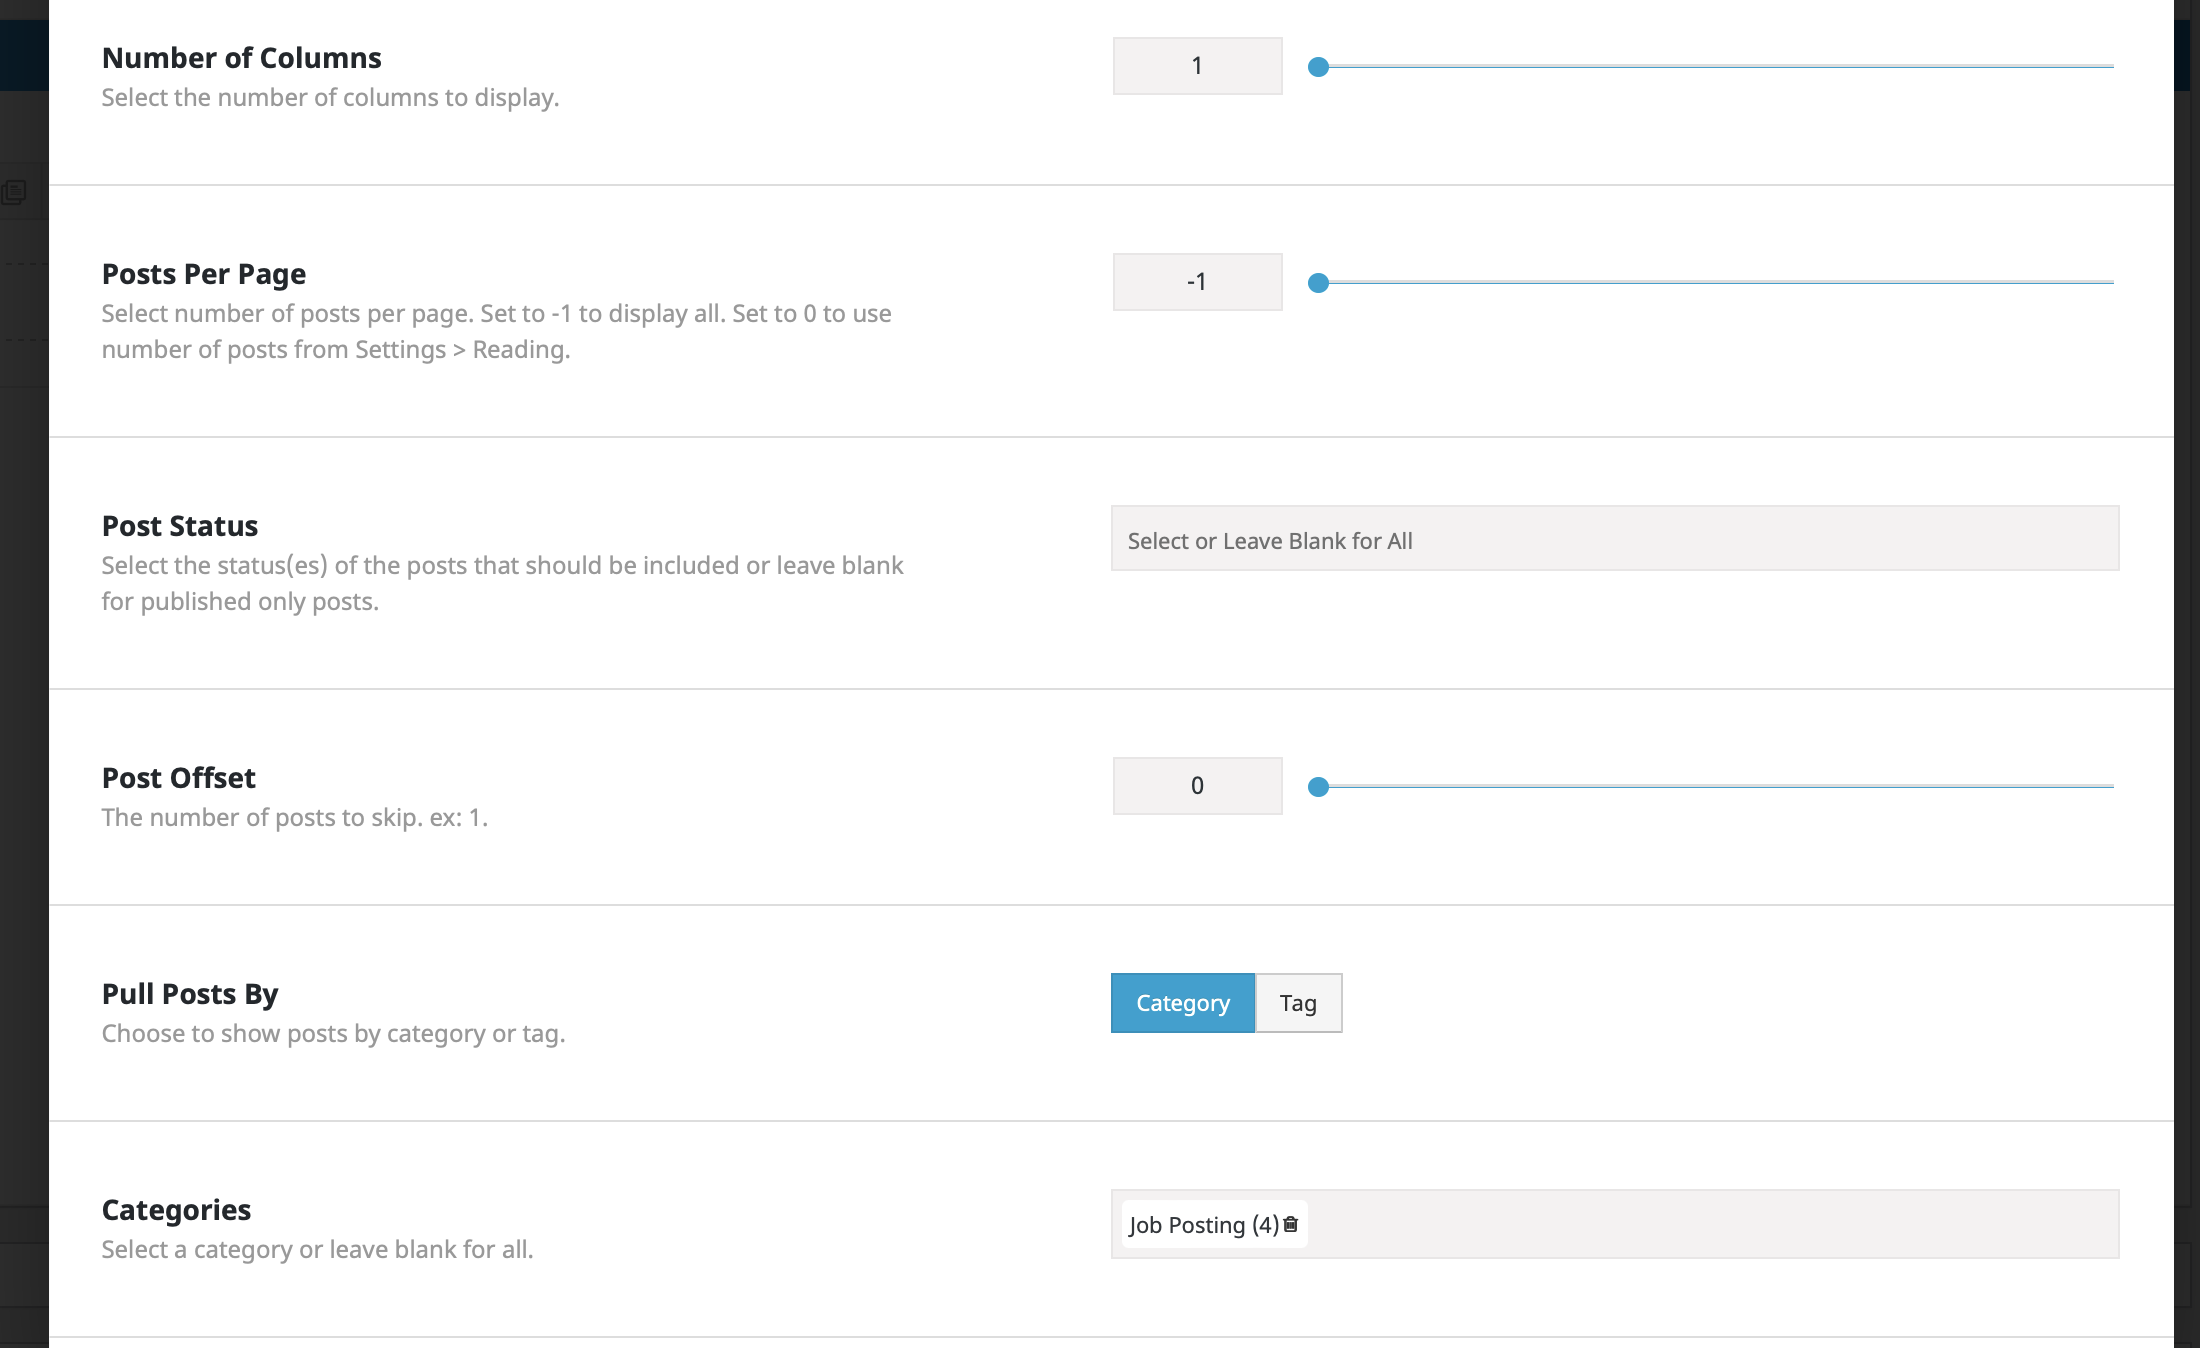
Here’s where the dynamic part of the content comes into play. Notice that the element is pulling posts by a category called “Job Posting”. No other post types will show on the page.
Job Postings
Job Postings have some very specific formatting requirements. Let’s take a look. From the Dashboard, we can look at all the posts on the site:
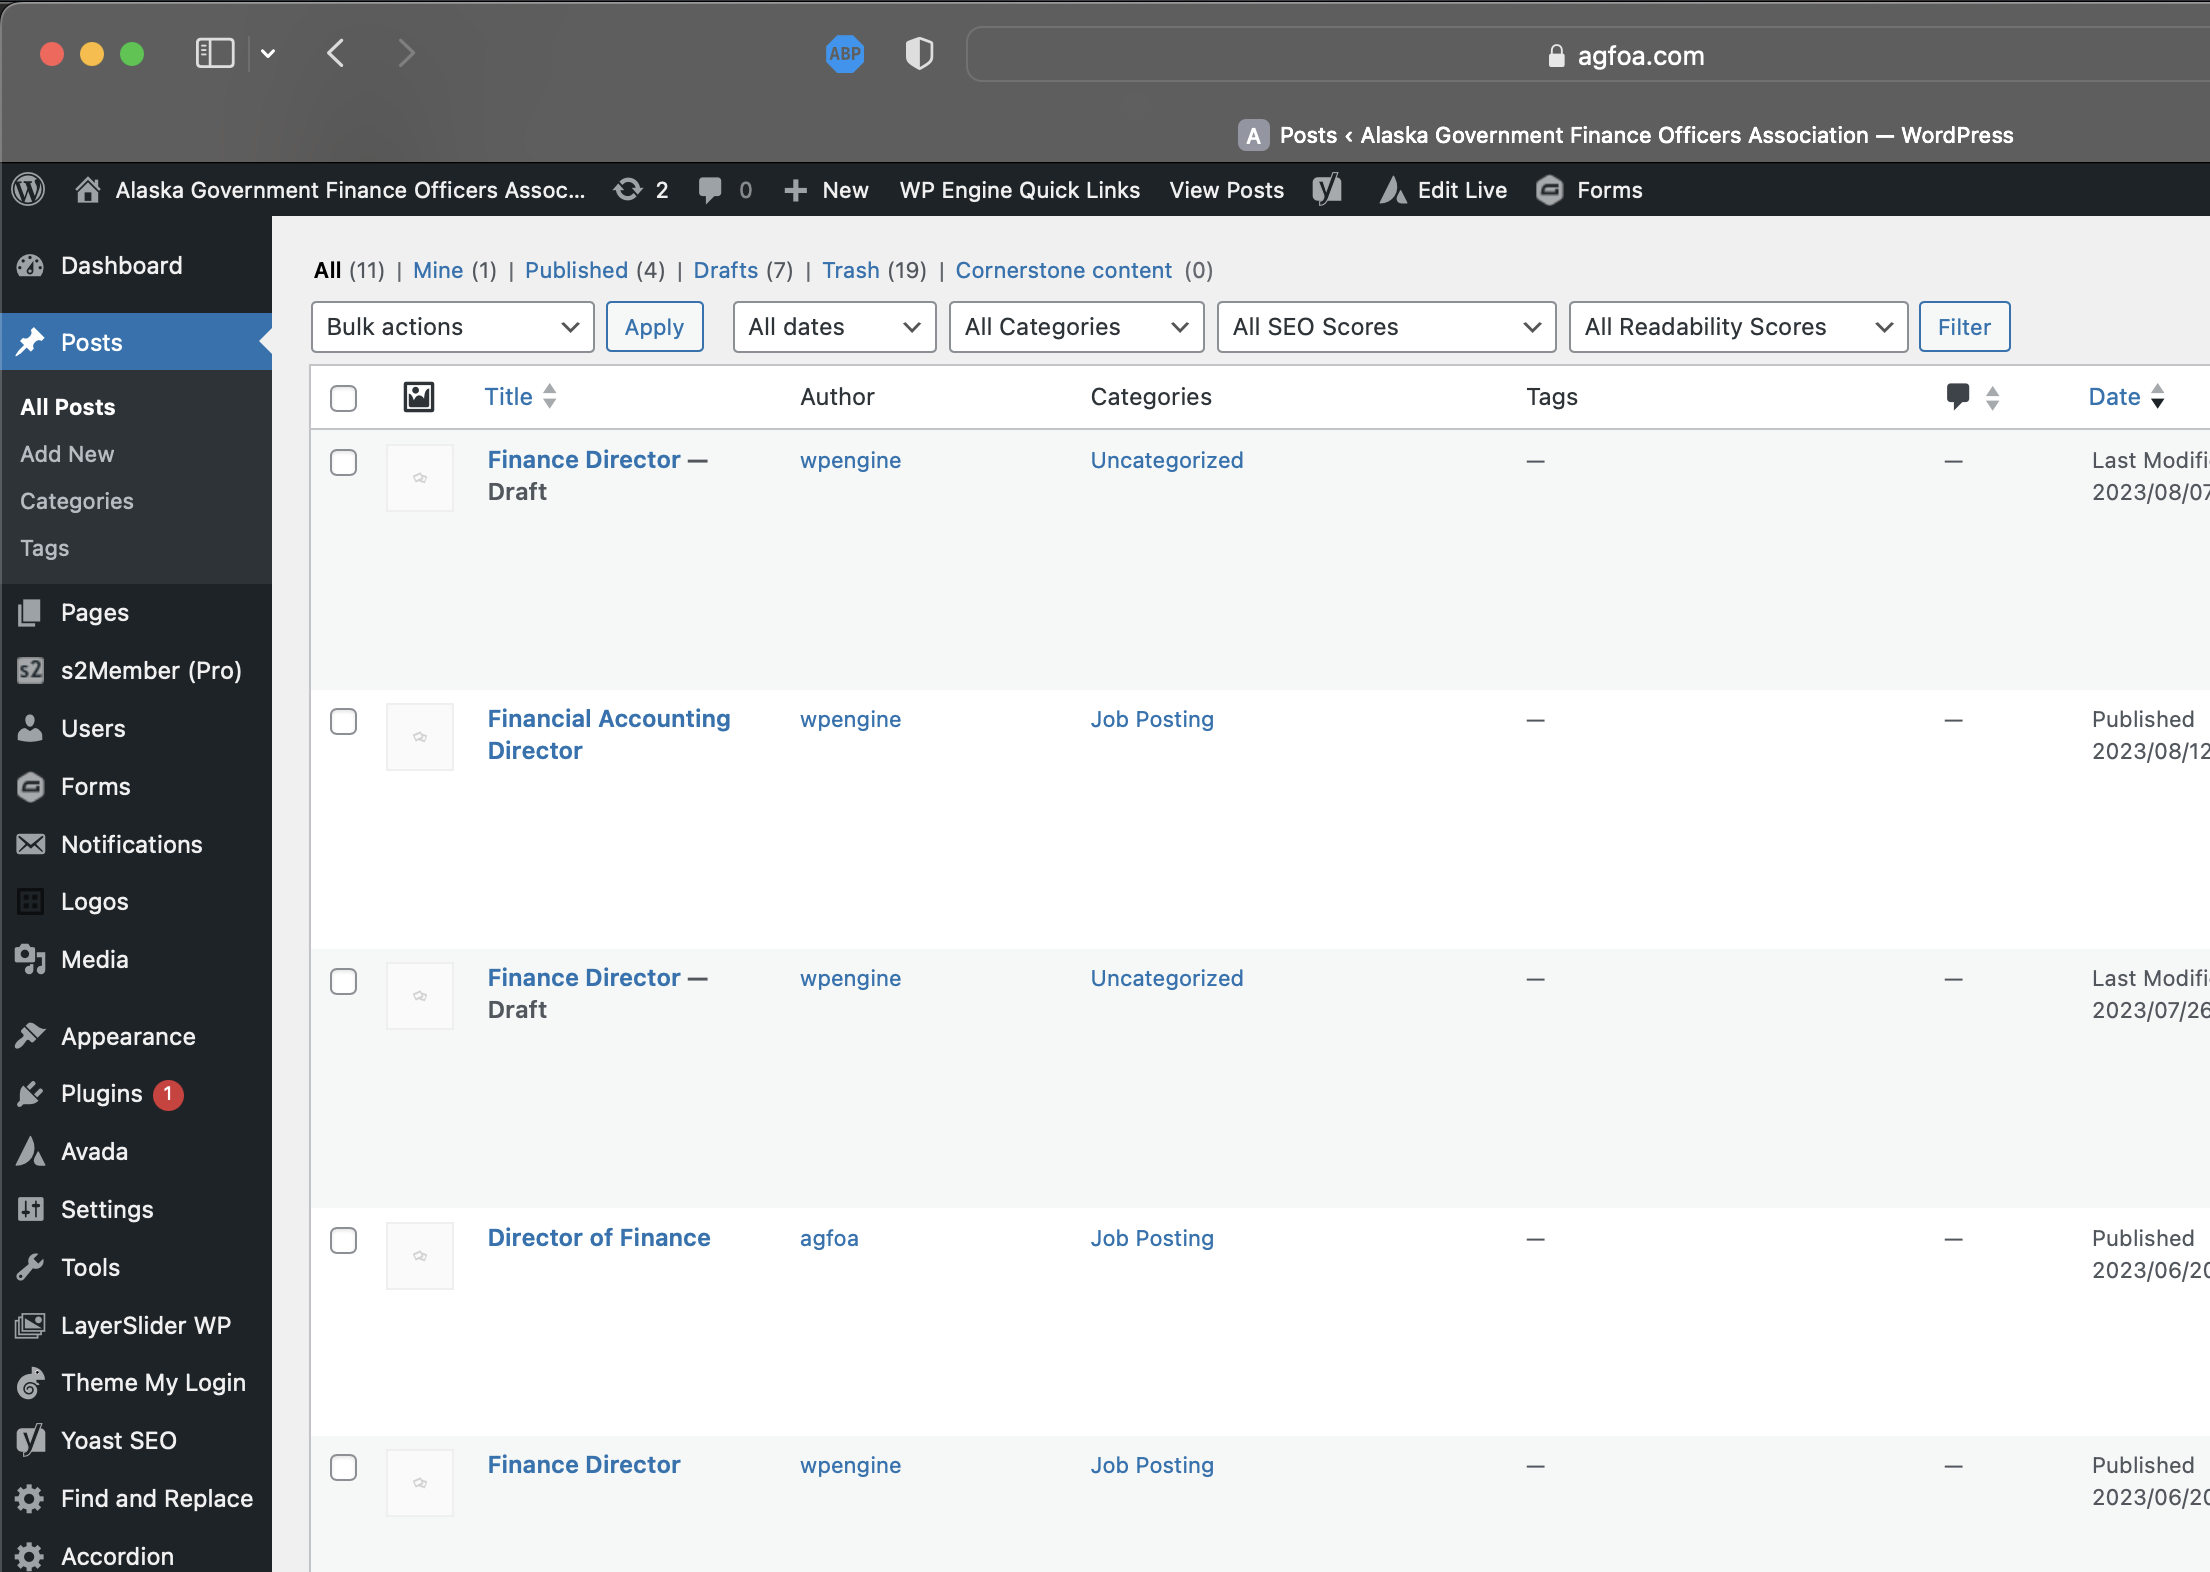
Note that the posts the have “Draft” underneath will not appear on the website. Also note that those post that are “Uncategorized” will not appear on the Job Posting site. Let’s take a look at one of the posts from the back end:
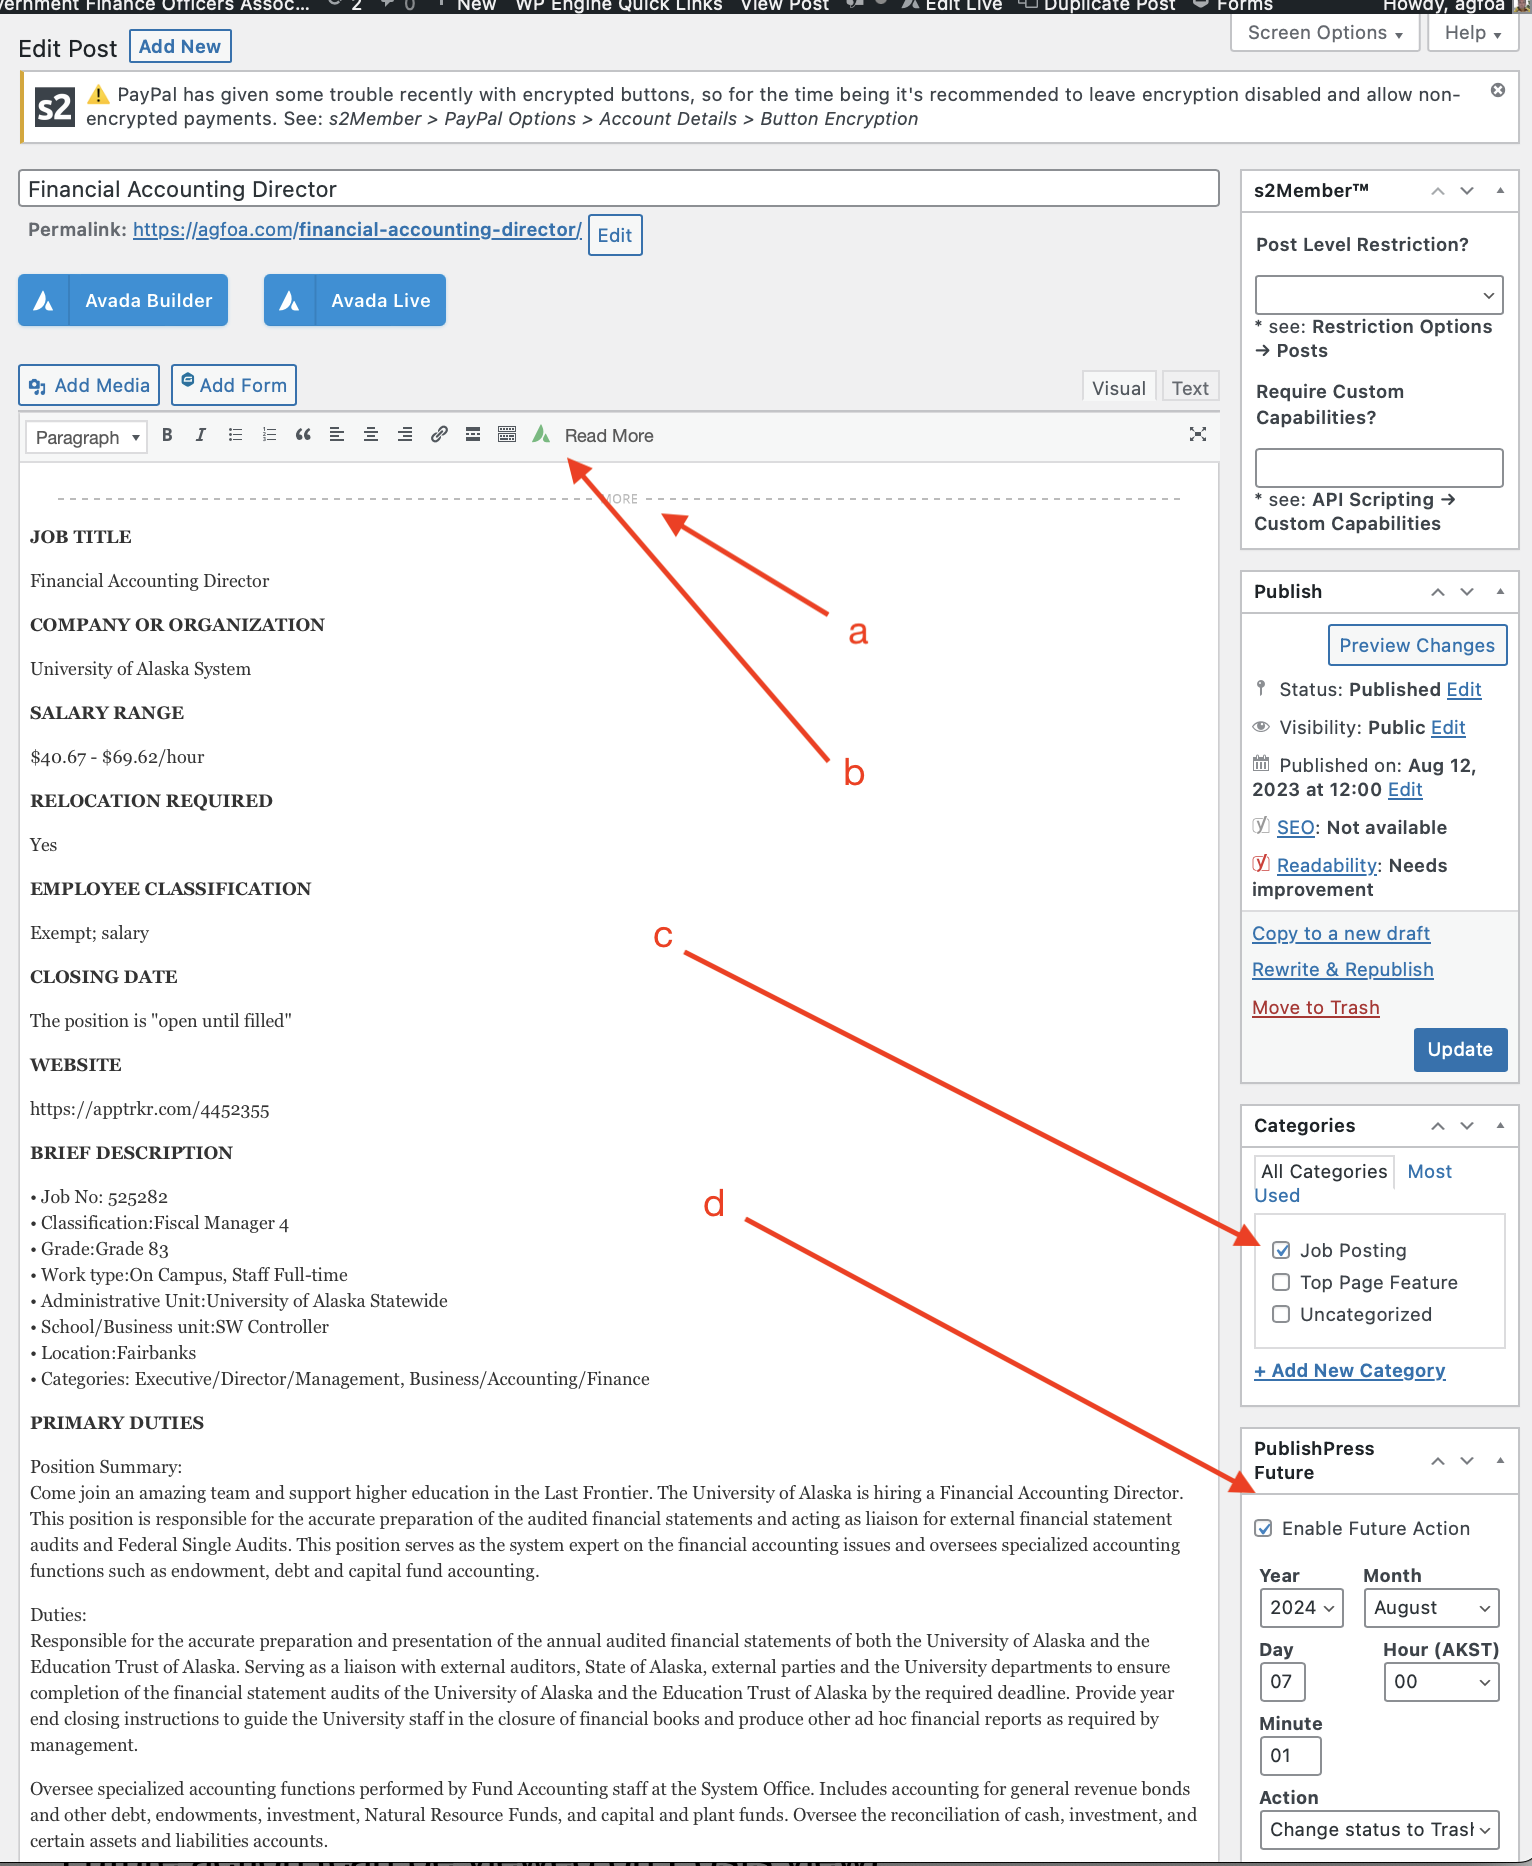
One trick we are using with Job Posts is to hide the text of the post itself. We do this for two reasons: one, it could make the Job Postings page on the website very long if all that text showed up, and 2) these posts are automatically emailed to members (more on that under Plugins), and that text would show up there as well.
Text under the “More” line (a) will not show unless the user opens the post itself. We do that by clicking the “Read More” button (b).
CRITICAL to making a Job Post show up on the Job Postings site is making sure that the Categories Box is checked for Job Postings (c).
Finally, to keep Job Postings from remaining on the site forever, we set an expiration date using this nifty plug-in (d).
Other Posts
The AGFOA site is not limited to just using posts for Job Postings. Posts could be used for newsletters, for example, with a Recent Posts element on the Home page that shows only the most recent newsletter, and then an archive page that contains all the newsletters.
Special Functions
Hiding/Unhiding Containers
Membership
Forms
Logos
Membership
The AGFOA website uses a plugin called s2member to provide some powerful membership features. This plugin connects with AGFOA's Authorize.net account in order to allow members to pay to join and renew their membership. S2member keeps track of members End of Term (EOT) and sends an email message when the term is close to expiring. The system also allows for various kinds of membership levels, which can then determine what a member can view on the website, how a member is contacted, whether membership requires a payment, and what information is sent to members.
Membership is currently set to last one year from the date of payment. If payment is done before the EOT, then the new EOT is set to be 12 months from current EOT.
The s2member plugin is pretty complicated, so it is best to leave changes to the plugin parameters to your web designer. However, editing individual member information is quite easy, and will be described below.
Member Access
Members get discounted conference registration.
Members get notification of new job postings
Members get access to membership list
Members have a "Members Only" area of the website, though currently empty.
Membership Levels
Within s2member there are five levels of membership:
Level 0 = Free Subscriber: Folks who were members, but have not renewed before their EOT expires.
Level 1 = Honorary Members: Determined by administration.
Level 2 = Associate Member: Determined by administration.
Level 3 = Active Member: This is a member in good standing with a paid, current membership.
Level 4 = Administrative: These are folks who have access to the "back end" of the website. They do not have an EOT date.
Exporting Membership Data
You can export a csv (comma separated value) file of your s2member database. The resulting file can be opened in a spreadsheet application. The spreadsheet will likely need some cleaning up. There will be a few strange columns and other odd data, but these should be readily apparent. Once the spreadsheet is formatted, it can be handy for creating rosters, email lists, etc.
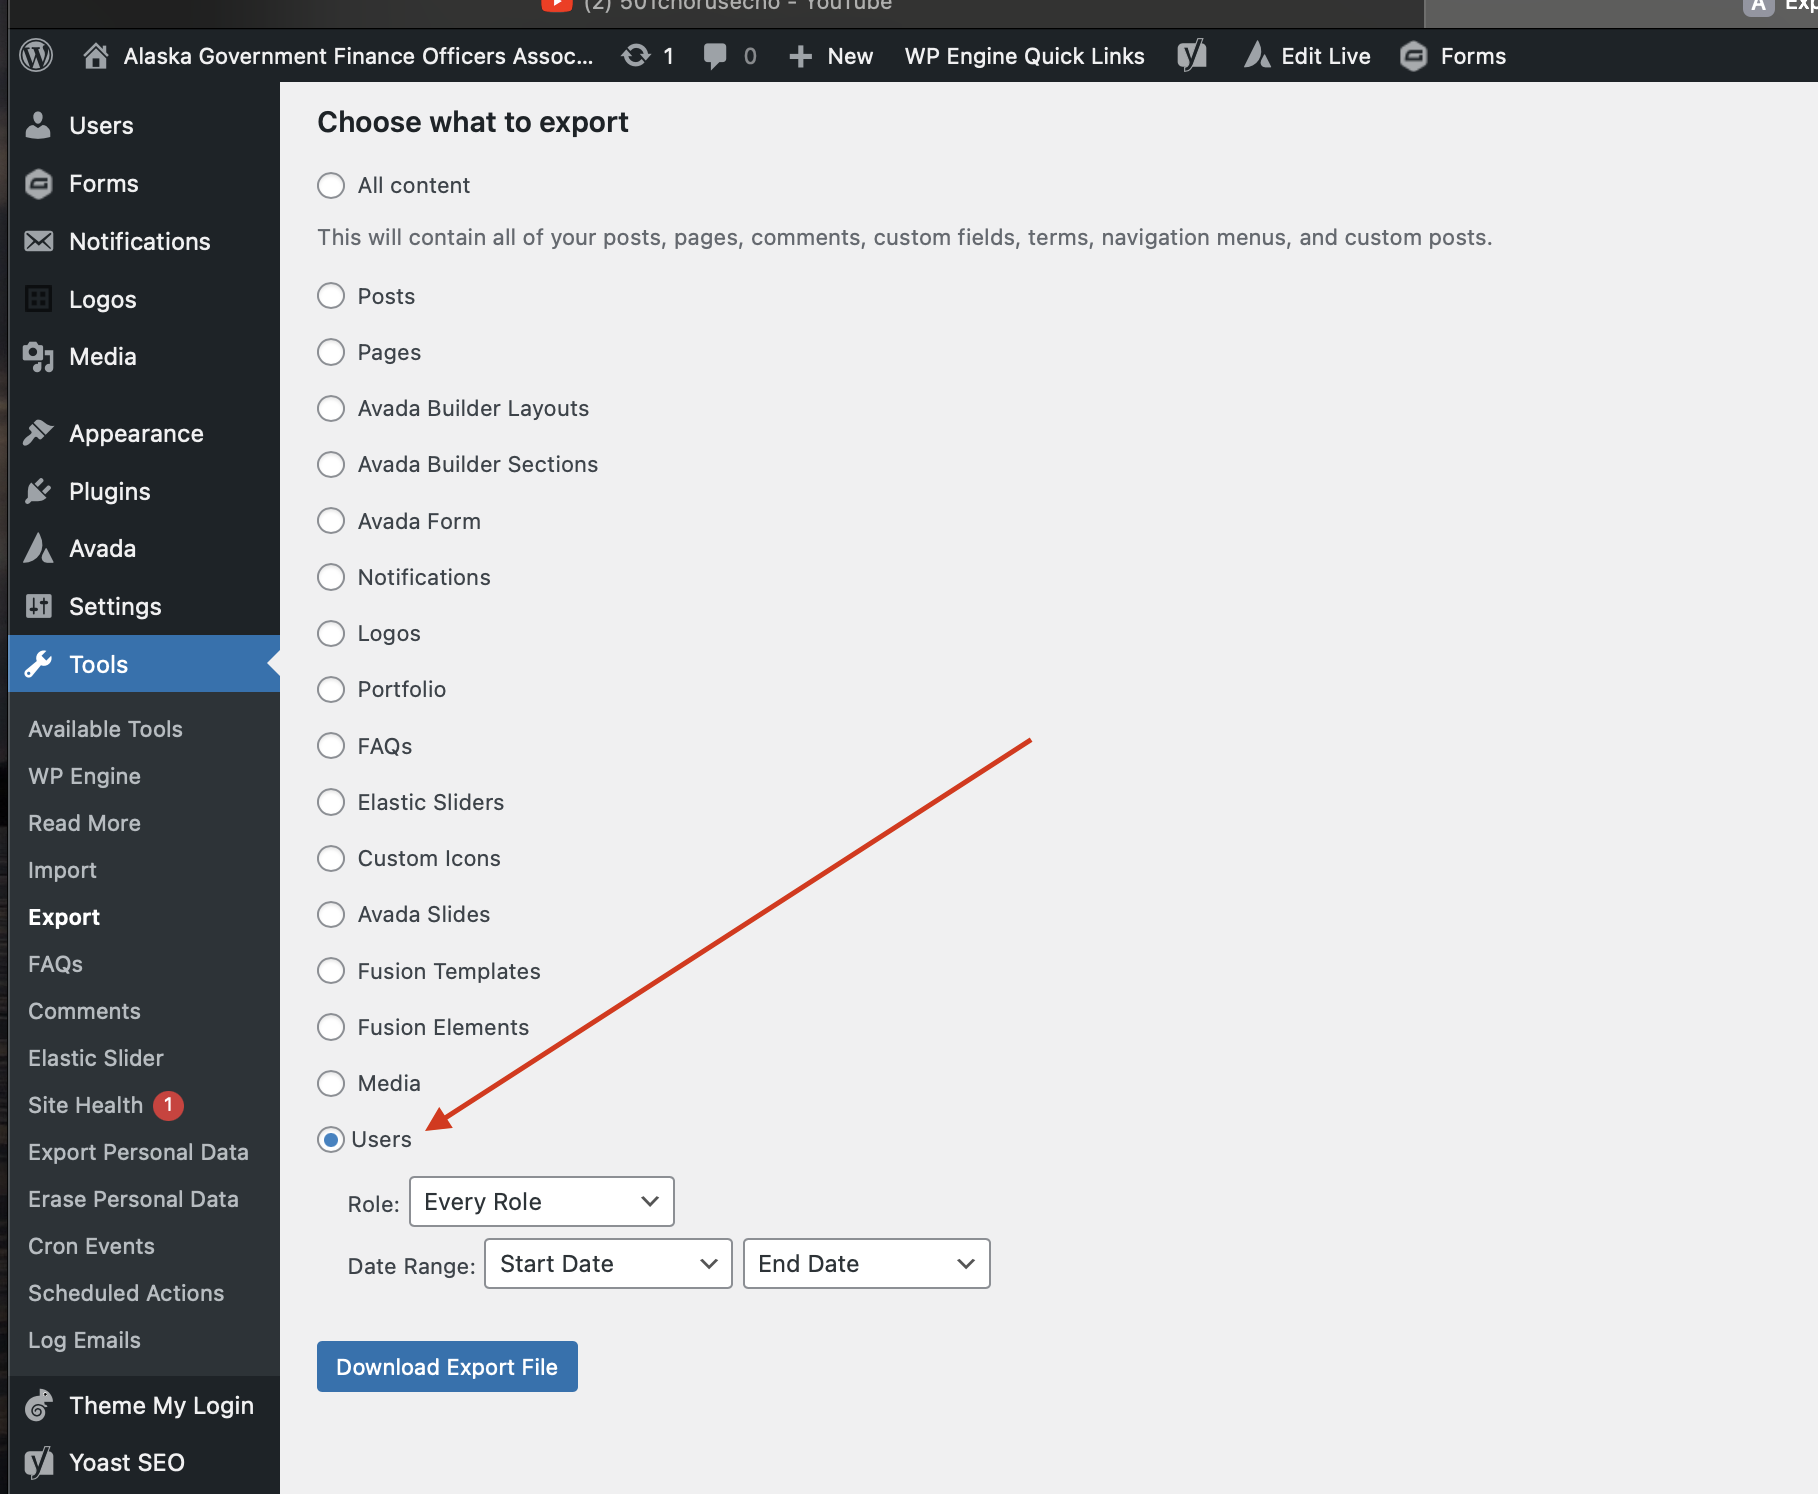
From the back end, click on “Users” then “Export Users”
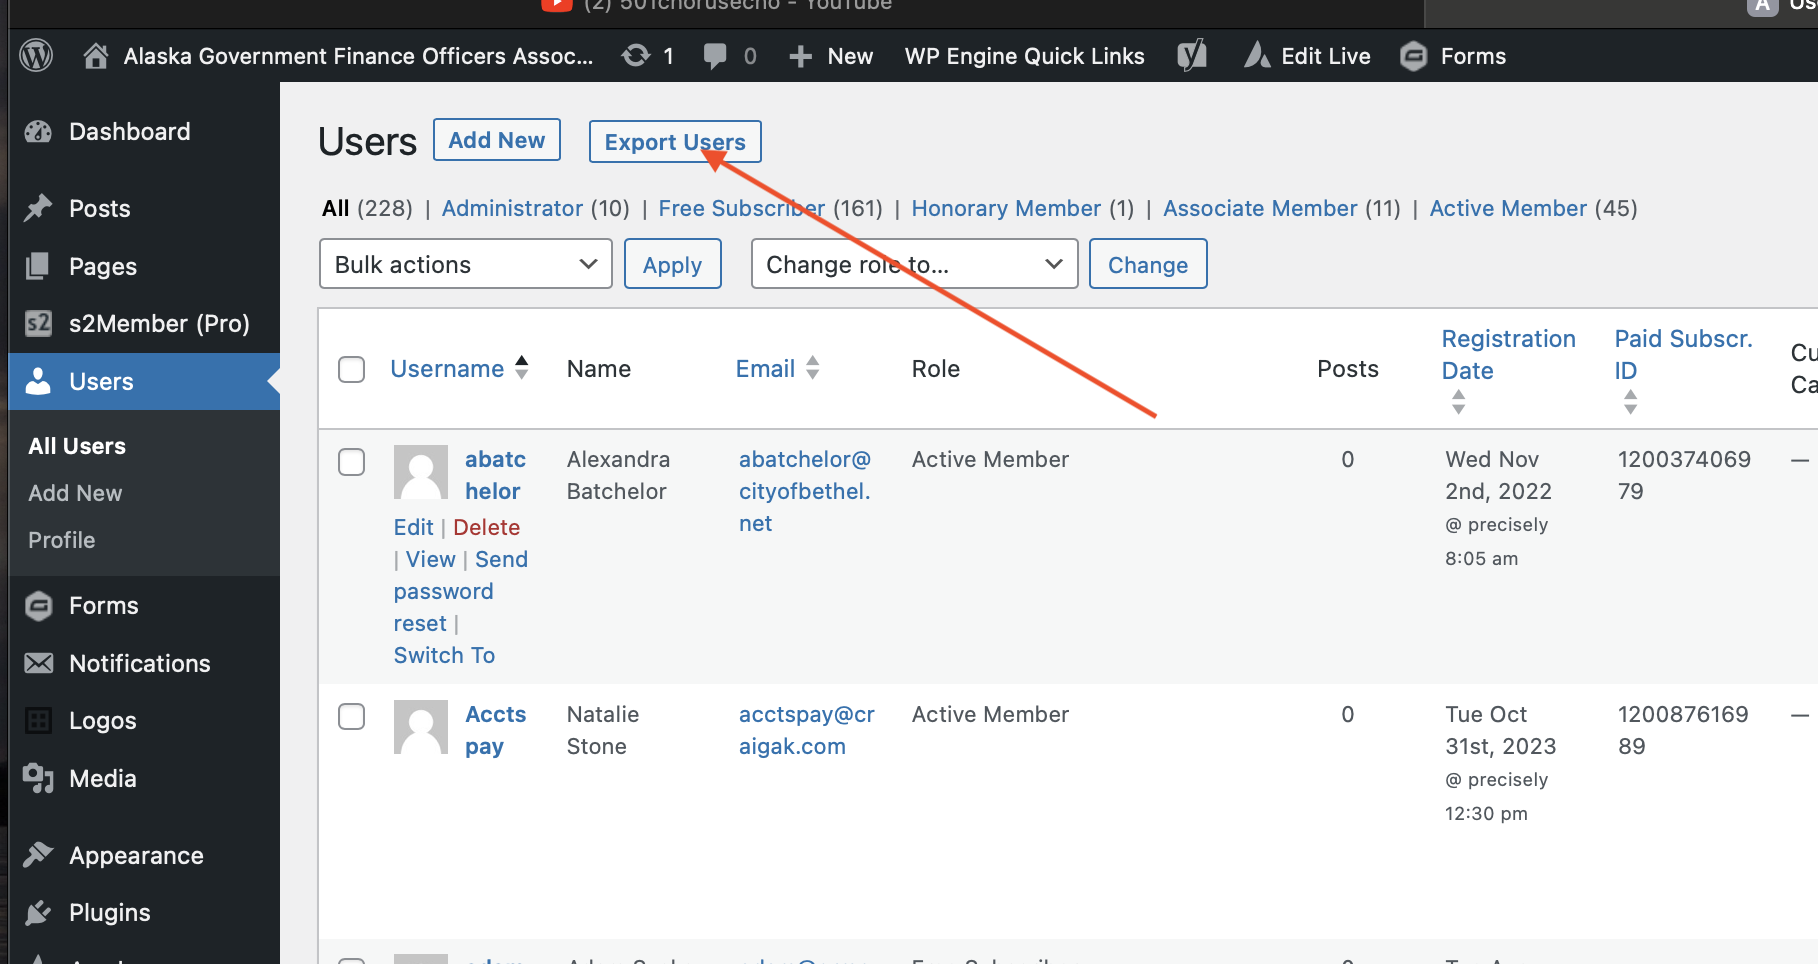
Then, just scroll to the bottom of the frame to choose ”Users”. Note that you have some other options here for filtering your export.
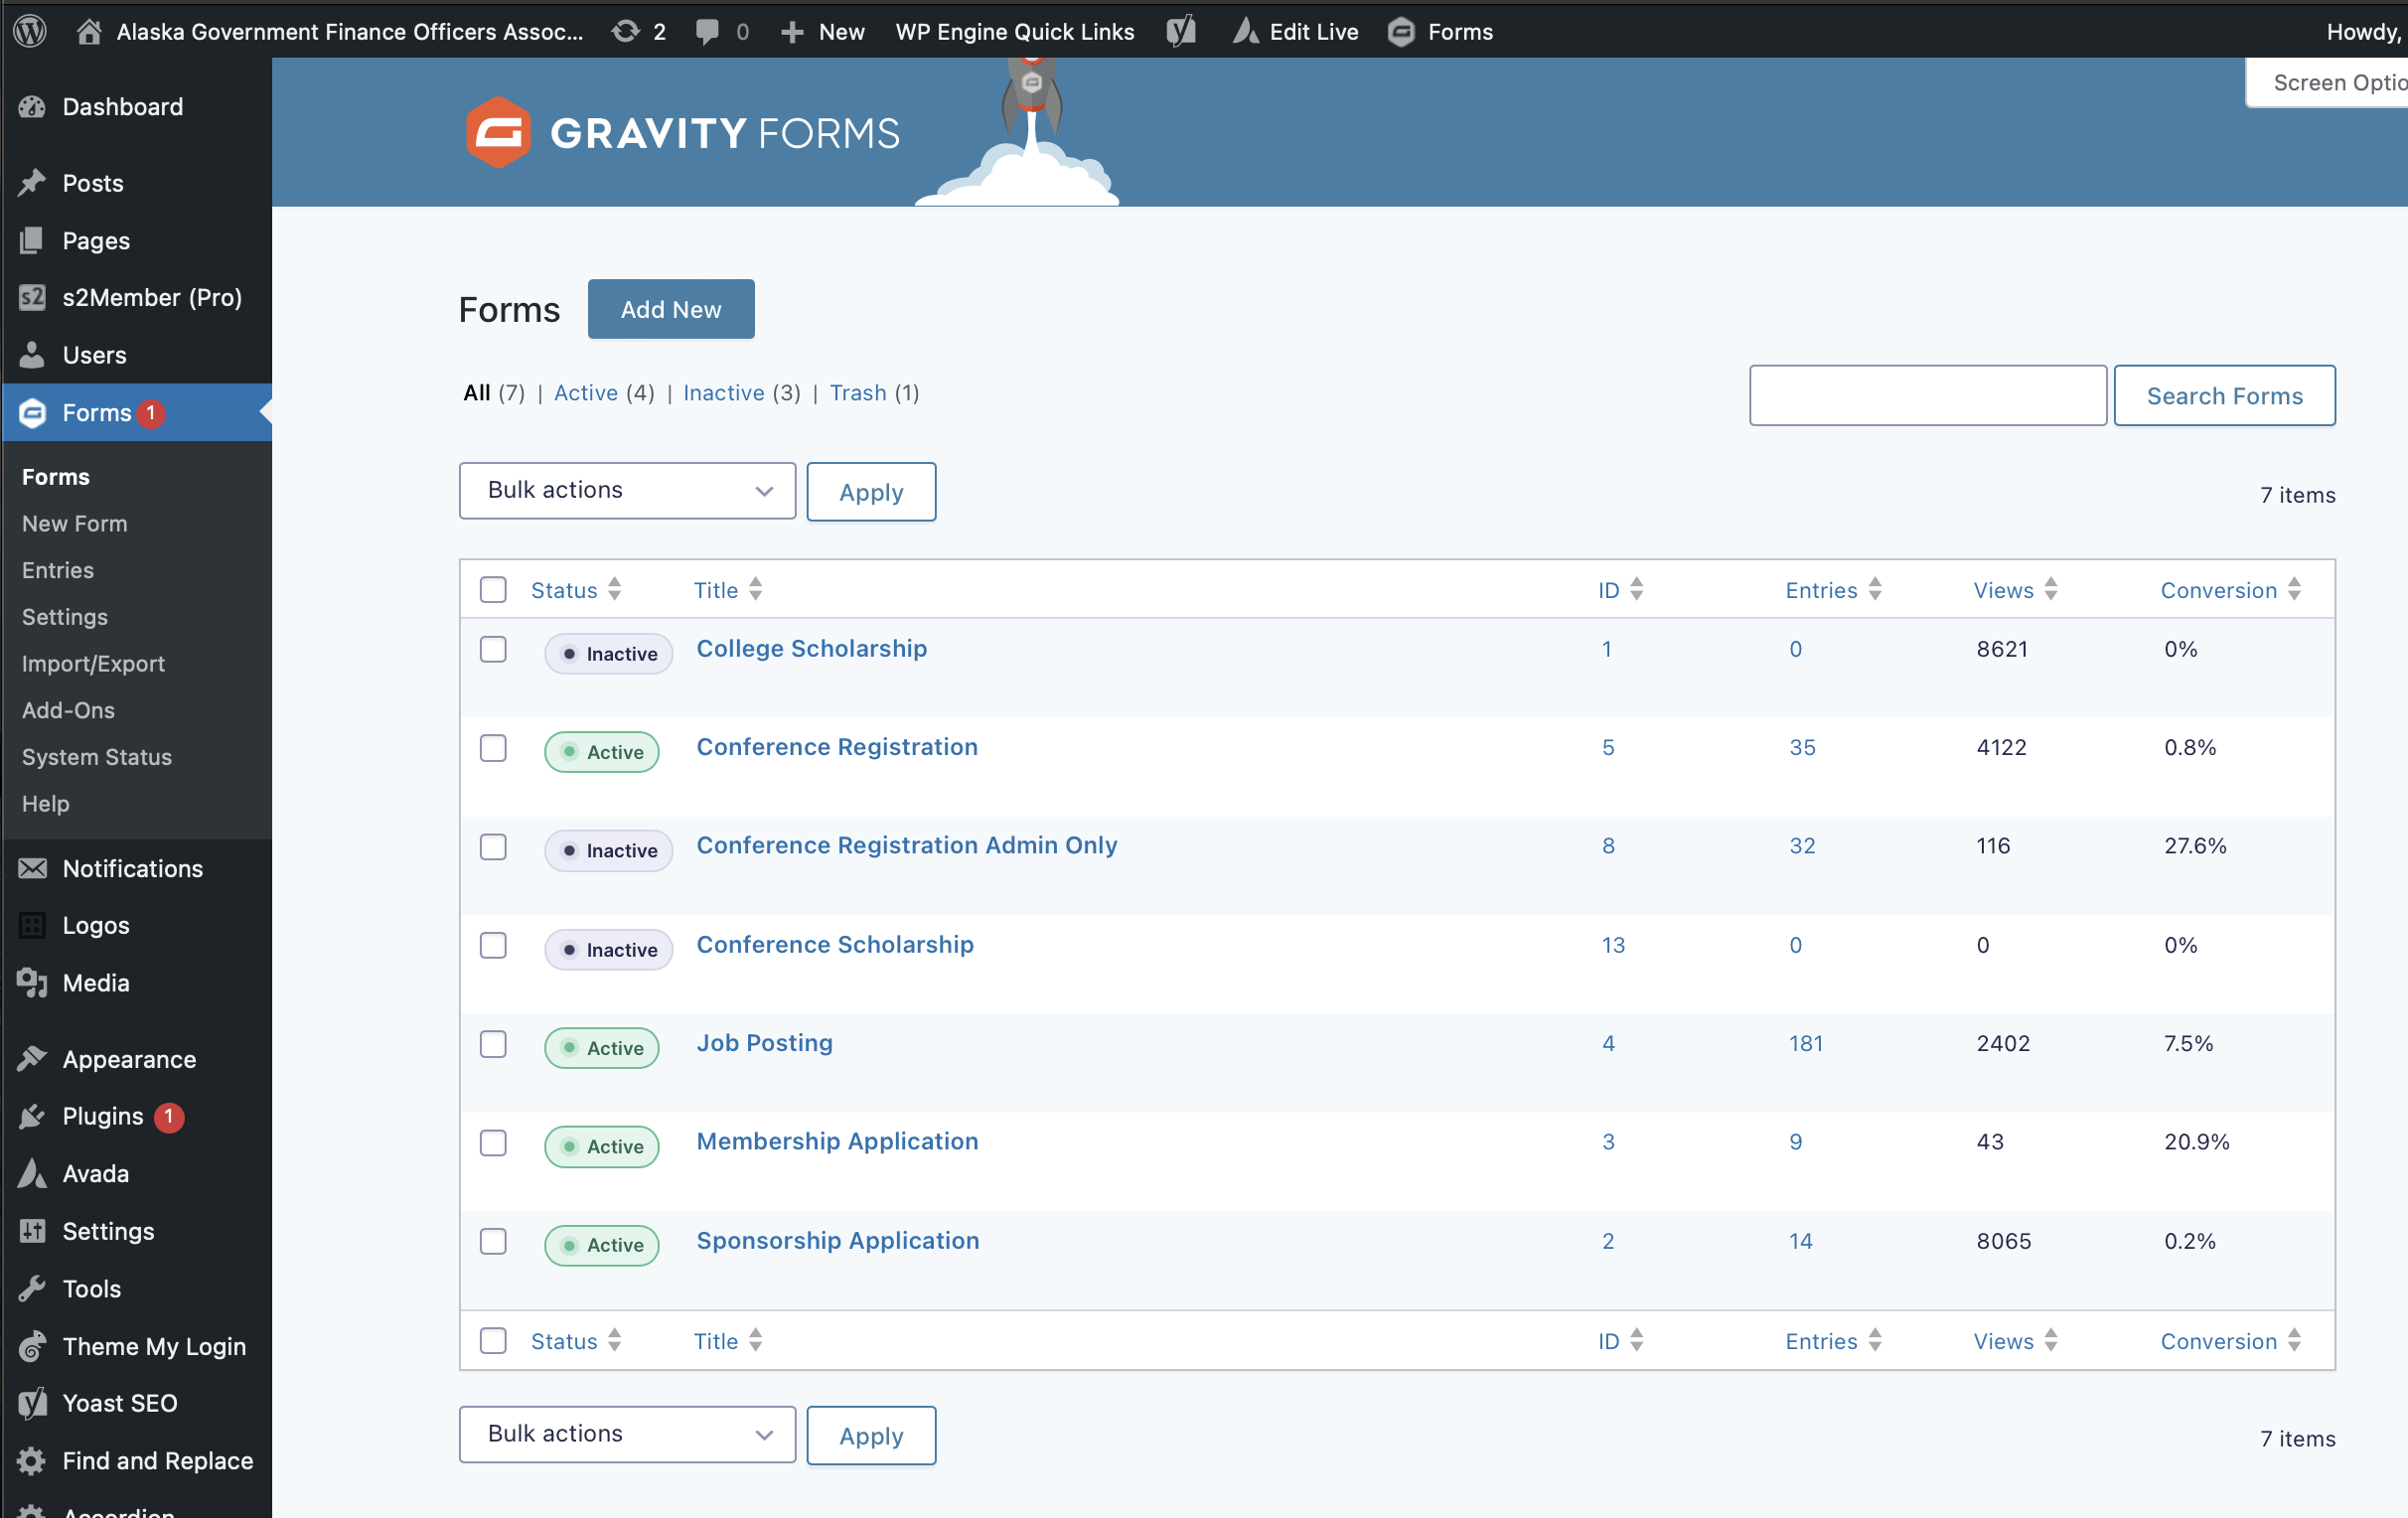
Gravity Forms
Gravity Forms is a very powerful tool. It is used throughout the AGFOA website. Let’s take a look at the forms. You can see them by clicking “Forms” on the Dashboard:
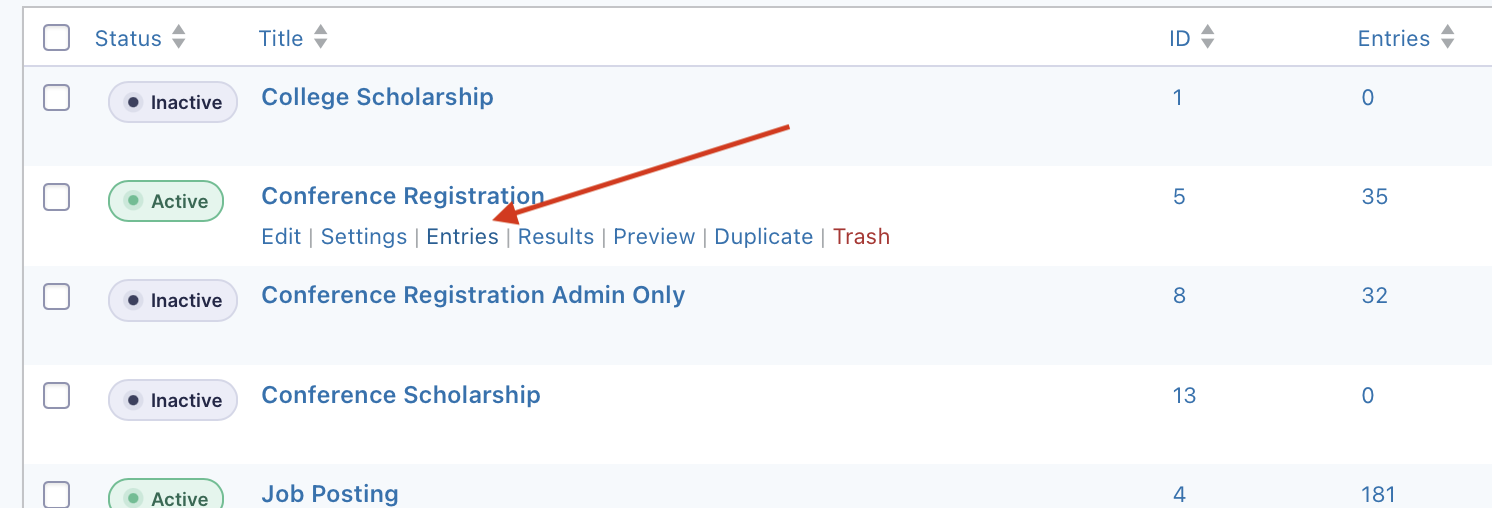
Viewing Data
Moving your mouse under any form will reveal a menu of options. Choosing “Entries” will allow you to sort and view the data.
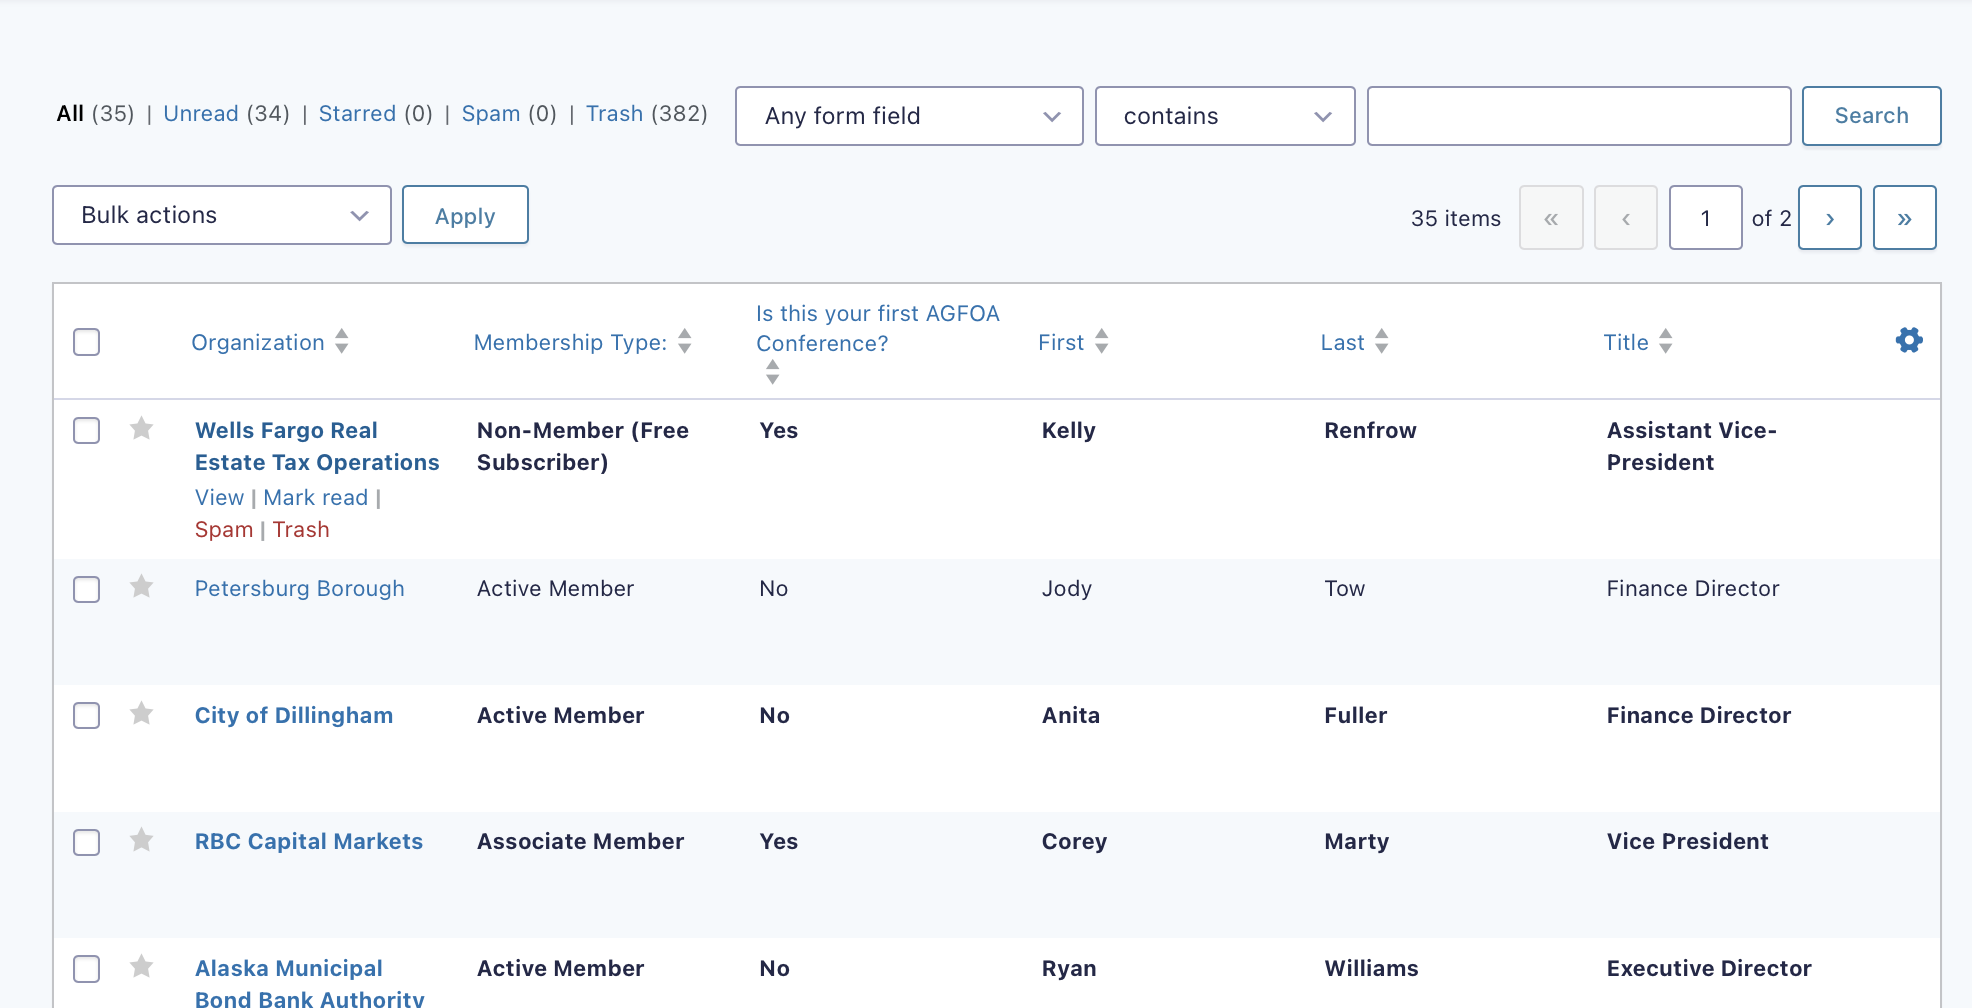
Once you are viewing entries, you can sort them by any column heading, or search for a specific term.
Exporting Gravity Form Data
You can export a csv (comma separated value) file of any entries to any of your forms. The resulting file can be opened in a spreadsheet application. Once the spreadsheet is formatted, it can be handy for creating rosters, email lists, etc.
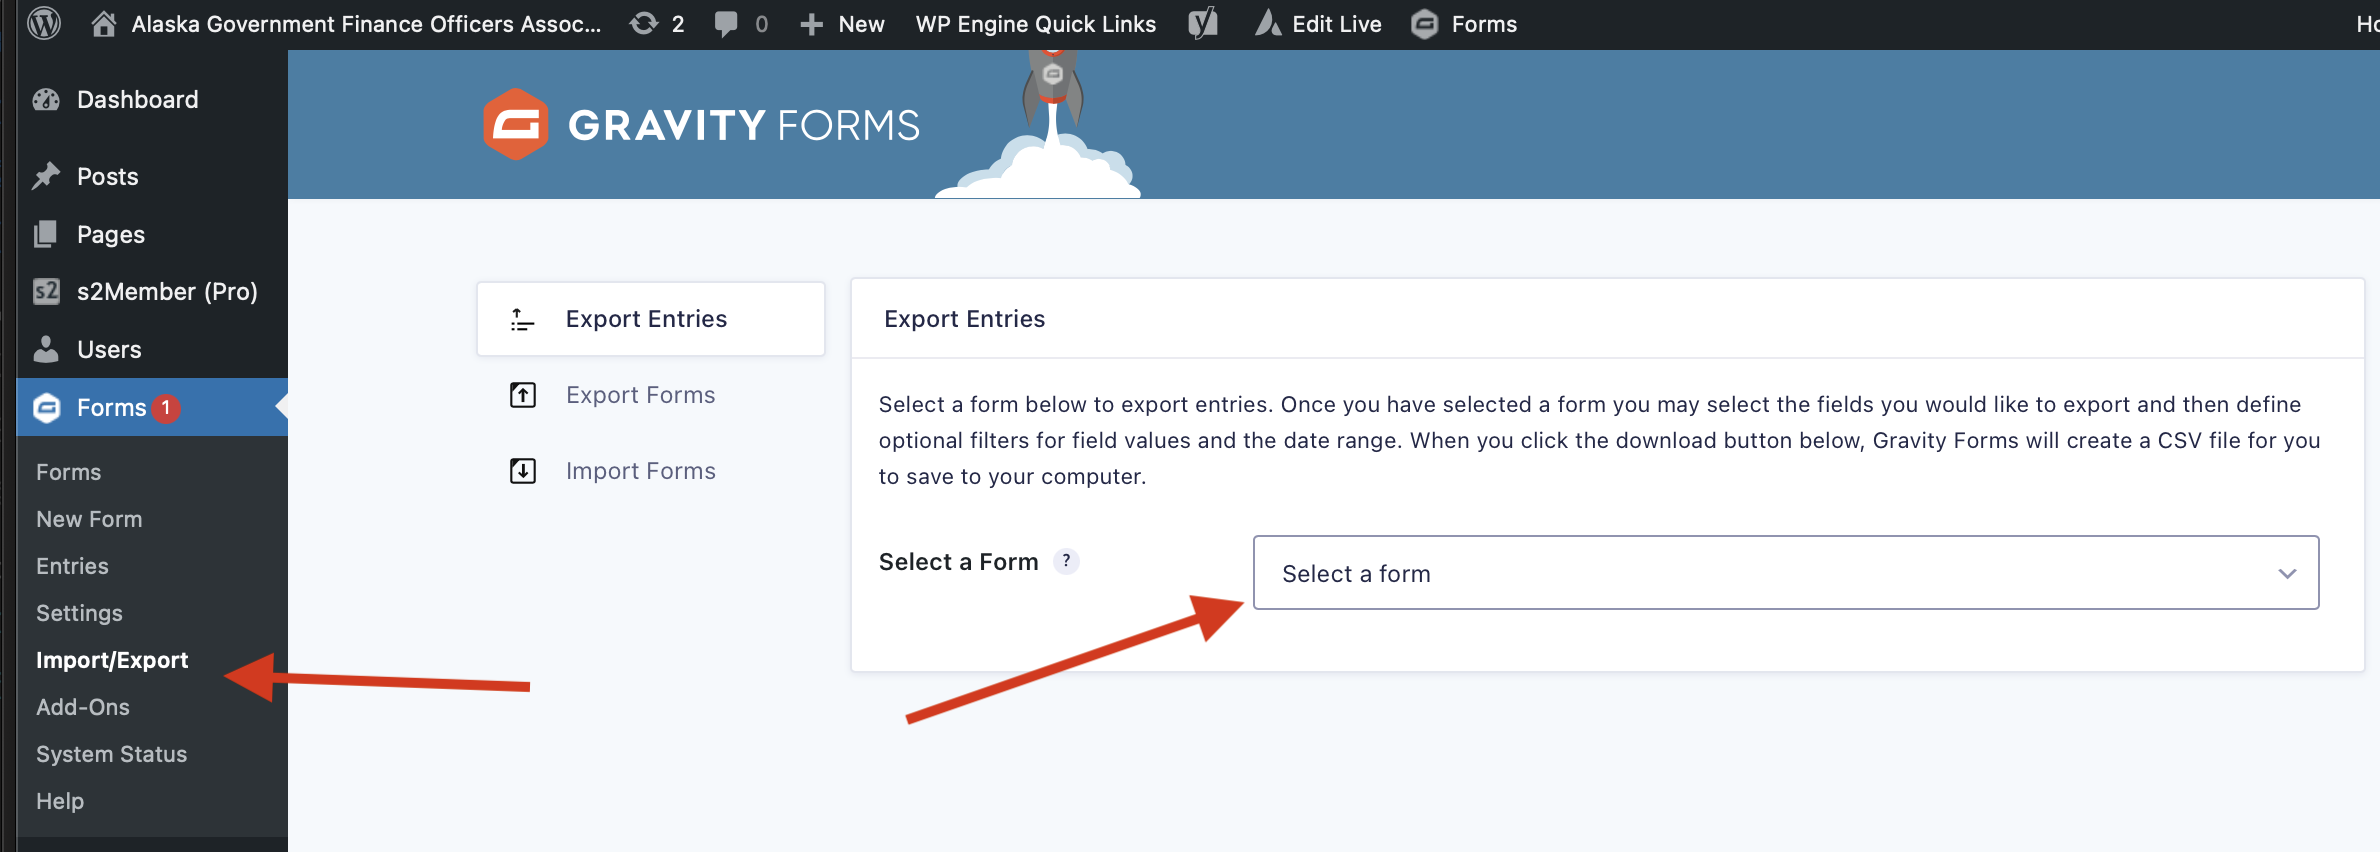
To begin an export, click “Import/Export” from the dashboard under Forms, then select the form.
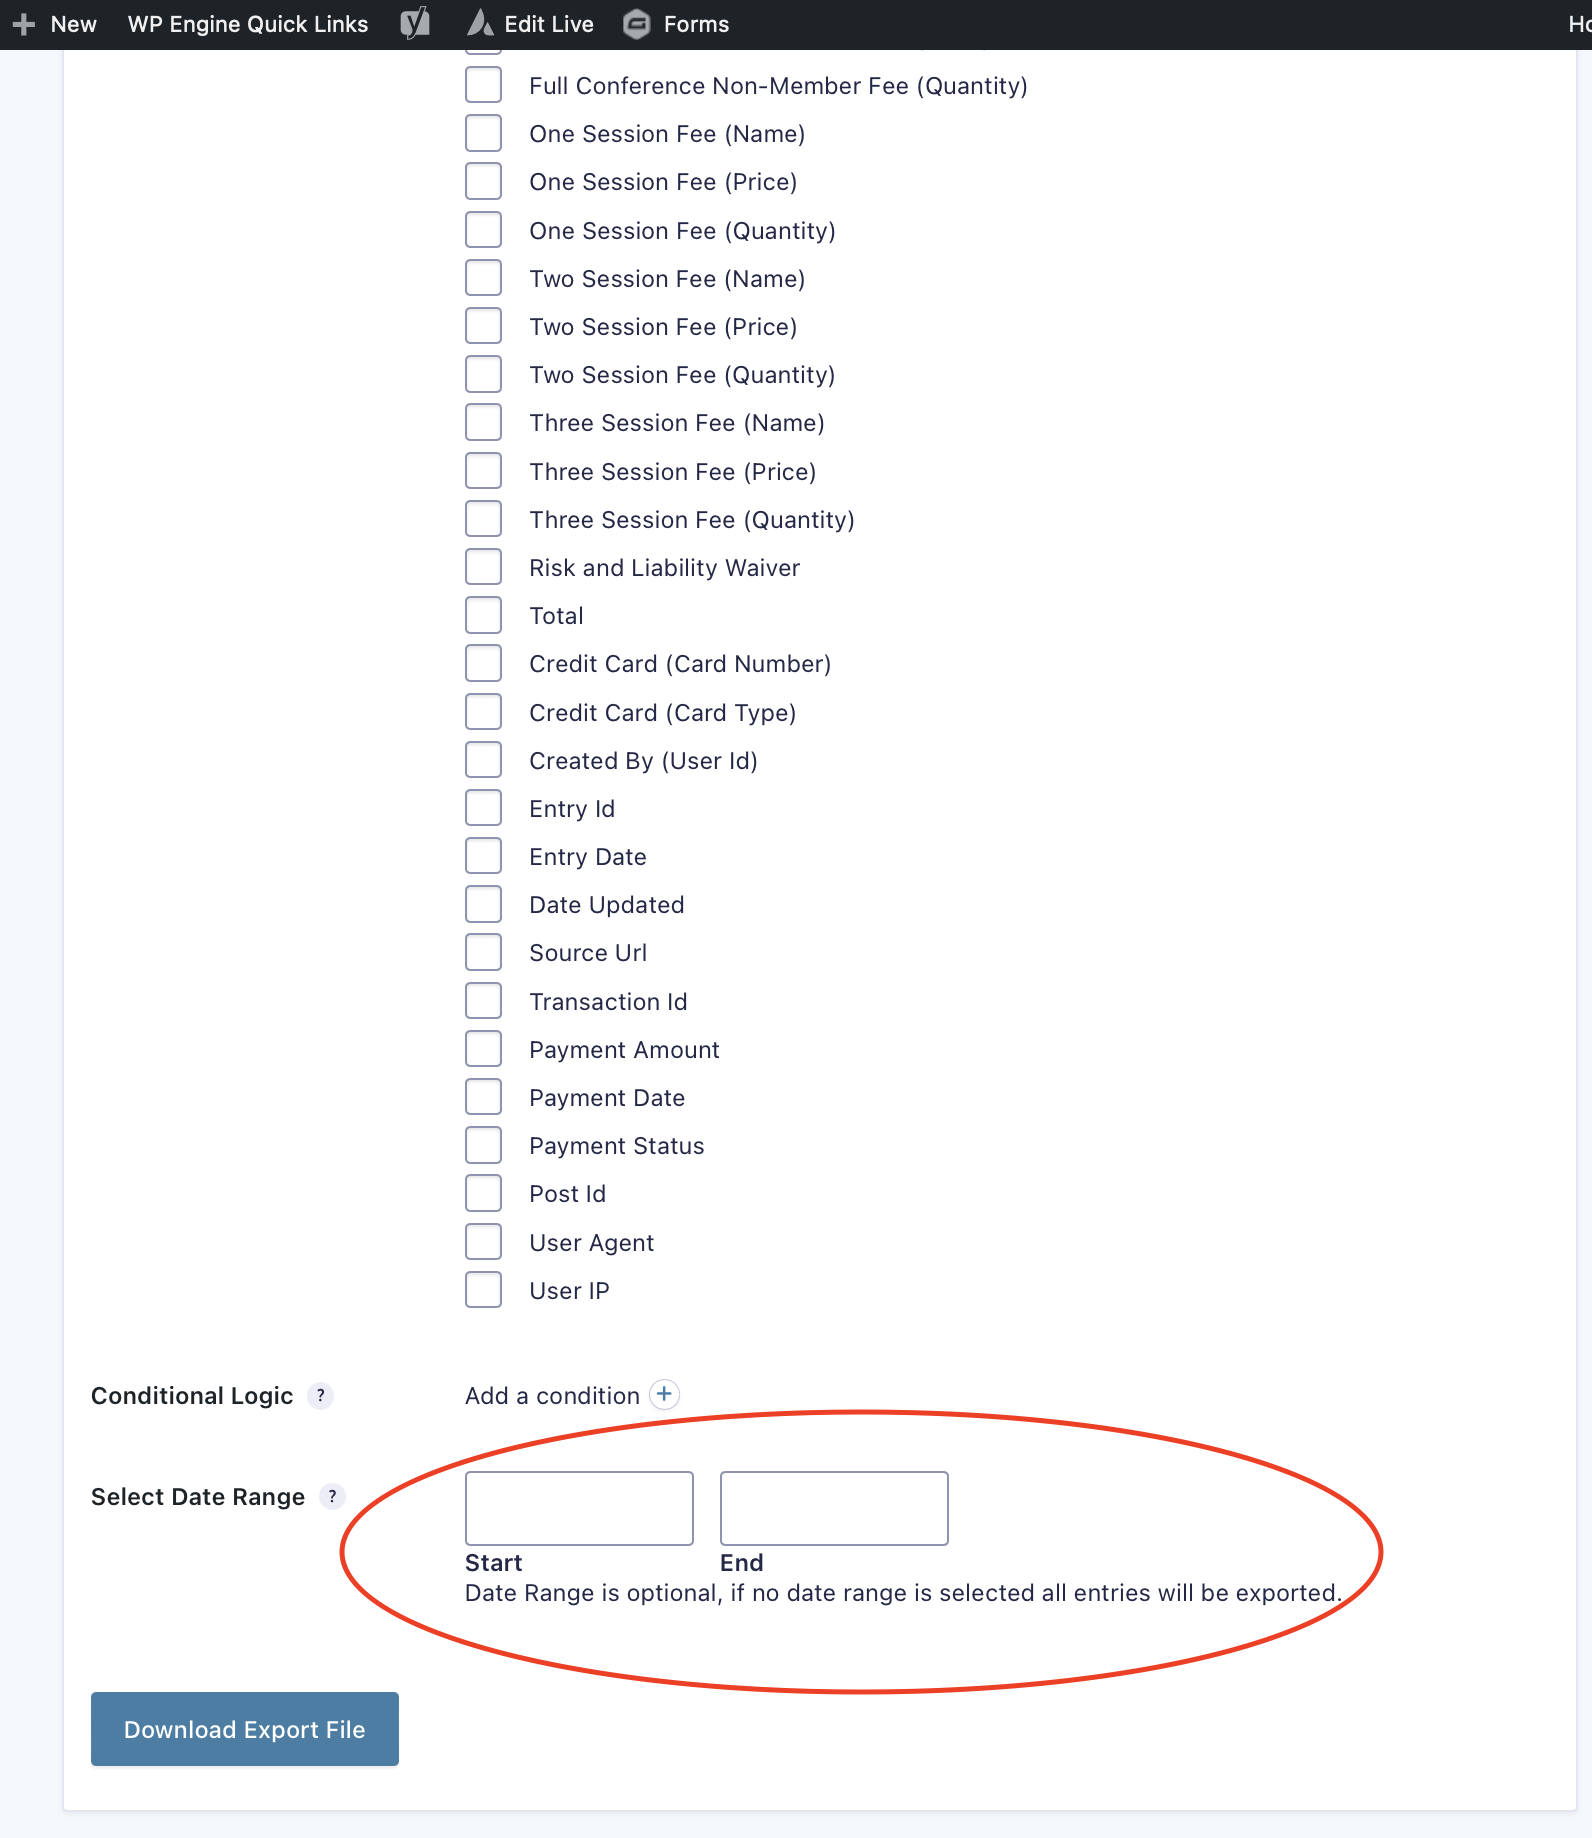
From here, you will be shown a list of all the form fields. You can choose which ones you want exported. Many of these forms contain data from multiple years, so be sure to scroll down to the date range if you want to filter the data on those parameters:
Hiding/Unhiding Containers
AGFOA has an annual conference. For the web